Saturday, November 27, 2021

Common Core and Math: Running to the Win with RUNNS

 By Heather Pfrunder, M.A.Ed          SDC Teacher and Education Specialist

November 27, 2021


I can attribute my learned affection for math to the teaching formula of Eureka math: concrete objects, visual models, then representative diagrams.  Somehow in the vertical alignment of visual aids, math ceased to be a rote memorization of steps and procedures to fun puzzles to be solved.  However, I quickly found that beyond the steps of number sense for my students 100% of them stumbled to understand what to do once it came time to apply the concepts in real-world scenarios (i.e. word problems).  We would go confidently from adding using 1:1 correspondence and manipulatives, to count-on strategies, to simple algorithms, and then crash into a halted stop once it came time to apply them.  Logically, the Read, Draw, Write of what we had been doing all along should have worked - but it didn’t.  We would pull out the Eureka Math workbooks and would never get past guided practice: doe-eyed, my students would wait for me to explain the vocabulary, where to find it, and what to do with it.  I was waiting for the flicker of recognition, a spark of partial understanding that would never come - or at least never come until I adjusted my strategies. Thus it came to be, I, the lover of the written word, came to research and write my Master’s Thesis on my lesser love: Math.  


What I learned was a strategy to address the specific challenge of many of our students with language delays.  It is also the challenge that faces many of our English Language Learners.  The beautiful thing about this strategy is that it nestles quite nicely within the framework of Read, Draw, Write.  By using schema-based instruction (instruction to develop metacognition for the development of problem-solving skills through the use of mnemonics and/or visual aids/charts), my students were able to have real and lasting results.  Enter the development of my RUNNS strategy: Read, Underline, Number picture, Number sentence, Solve. While I can’t lay claim to the original idea by Rockwell, Griffin, and Jones (“RUNS… (1) Read the problem, (2) Use a diagram, (3) Number sentence, and (4) State the answer” (p. 90) , I can say that via formative assessments I found my adjustment to be far more effective with my students. 

Here is how:


 While the acronym may seem pretty self-explanatory,  

there are a few tricks to it that really make it work.
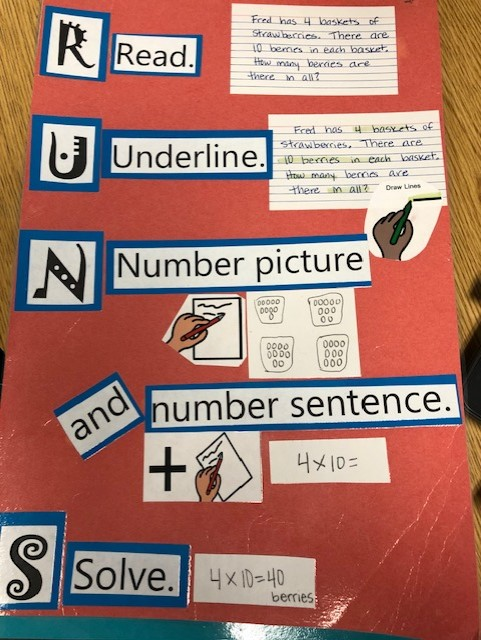

R - Read Read as in 1st read in its entirety and a 2nd read for specific chunking of info/close reading.


U - Underline.  Underline numbers and “special words” (i.e. "fewer, more than, each, groups, ect…") And most importantly, underline “the ASK.”  What is the question?  What are the key words there?  To know what to underline is the trick to this step.  For this I use AVID column notes for students to reference.  They find the “math words” then match them to their chart with a dry-erase marker.  By doing so, they are able to identify the function.  


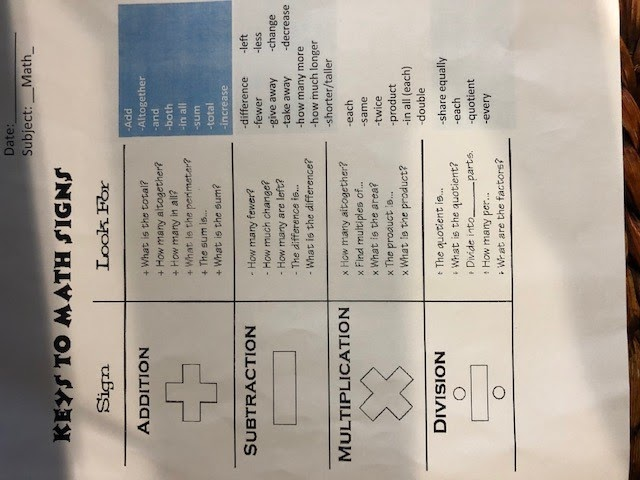
While the original note/visual was shared with me from another teacher,

I found that I needed to add more to it to be reflective of

the Eureka Math questions - thus the unofficial 3rd column.


N - Number Picture.  For this I usually like to set up expectations.  It takes a while for my students to remember just what is a number bond, a tape diagram, or an array.  Knowing which picture to use can be even more challenging.  Typically, Eureka Math highlights a specific pictorial strategy in the lesson set.  Front loading students to understand the expectation is key in helping struggling and/or unique learners.


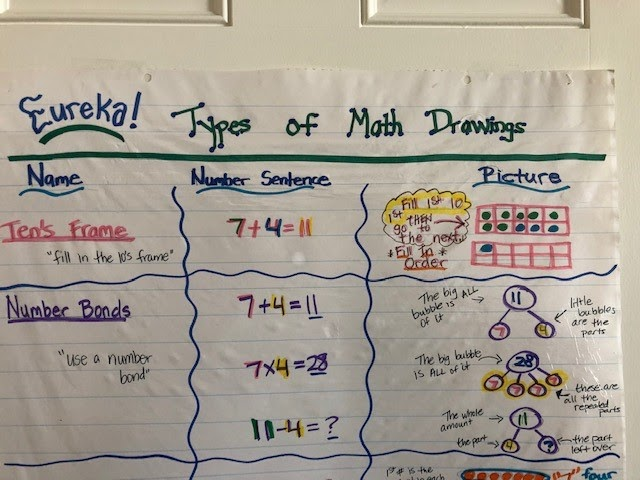
In this anchor chart I even gave examples of the Eureka Math verbiage for my 

students that require more direct examples.


N- Number Sentence.  Here we put it into place: what quantities (or use simplified verbiage to restate vocabulary “numbers”) what function do we put into place.  Tip: Vertically align the number sentence and label.  This makes the last step so much easier and keeps the train of thought connected to the word problem looking to be solved.


Numbers with their labels to make a vertical number sentence.


S - Solve. For this we double check, “Did we answer the ‘ASK’?”  This means making sure we have the written label.  I like to have students box their final answer - especially if there is a lot of work on the page.


And Solved it!  The answer is in a full sentence and boxed.


Whether you are struggling with a unique learner or trying to overcome sluggish student progress, this may be the solution.  Through the RUNNS strategy multiple challenges are addressed: breaking down of the “ASK” to solve, identifying key math vocabulary and their meaning, recognizing types of visuals, and putting it all together.  Like all good visual strategies, over time they needed to be faded back.  The beauty of this math strategy is that with repeated practice, students should be able to recall the specific strategy long after their graphic organizers are tucked away.  I’d love to hear if you are running to win with RUNNS!  


Common Core RUNNS Resource: Common Core Math Tools


Like what you read? Join me in upcoming blog posts where I continue to put these strategies into place and share resources!


Rockwell, S., Griffin, C., & Jones, H. (2001). Schema-based strategy instruction in mathematics and the word problem-solving performance of a student with autism. Focus on autism and other developmental disabilities. 26(2) 87-95. Doi: 10.1177/1088357611405039.

Sunday, November 14, 2021

Making Eureka Math More Engaging - Loop Activity


Does this sound familiar - take out your Eureka math workbook, turn to page 70 and work exercise problems 1 - 6?

Do you cringe when you look at the Eureka math workbook and note that it is not very student friendly - especially for our struggling math students?

Do you wish that you had more time to take a Eureka Math lesson and make it more engaging?


Heck, I have at some point over the past several years said yes to these questions and many more like them.  To combat these yes answers I try to employ different strategies and activities over the years to fill my teacher 'toolkit belt' with resources that can be meaningful and relevant for my students.  One age old adage I have tried to embrace this year is that 'Variety is the Spice of Life.'  Routines and procedures in the classroom create a safe environment for students - but who does not enjoy a surprise activity every once in awhile that shakes things up a bit.


Here is a recent activity I did with my math classes by taking Eureka exercise problems and putting them into a Loop Activity (this activity has also been called "I have, Who has" - Math Treasure Hunts, etc.)  I took each exercise problem and put it on a sheet of paper with the answer from a different problem at the top of the paper.  For this activity, I took 8 problems with their answers to create my Loop Activity.  The idea of the Loop Activity is that you work out the problem to find the answer and then find the answer on another sheet of paper.  You then work out the problem on that sheet of paper and find the answer on another sheet of paper.  The last problem's answer should then take you back to the answer on the first sheet of paper - which closes the Loop Activity.  Below is a link to the Google Slides Template that I use to create my Loop Activities - feel free to make a copy and edit the text with your problems/answers.


I put my students in groups to do this activity and I made two copies of the Loop Activity so that I could split my classroom in half to assist with student management.  I placed one page on each desk and had each group of students choose a desk to start at - in a Loop Activity it does not matter where you start.  

I noticed that during the activity students were engaged in solving the problems, helping each other, talking about math, and showing their work on a paper I provided to them.  Students were unaware of what I was doing - which was listening to conversations take place.  I noticed that at the end of the time allotted for the activity students had been successfully engaged in doing their math exercise problems while not thinking that they were actually doing math as usual.  I heard students say that it was fun, can we do this again, we need more time because we got stuck on a problem - all music to my ears that today was engaging and meaningful for my students.


"Variety is the Spice of Life" - do I do this specific activity a lot?  No.  This is just one activity in my
teacher toolkit.  I also use 'Level Ups' which take the Eureka math questions from an entire unit of study and build a pyramid with them so that the easier questions are at the bottom and gradually get more difficult until reaching the top of the pyramid with the most difficult question (Shout out to Ms. Keeton for these awesome engaging activities).  Mrs. Nelson (Spotlight Teacher), at my site, just shared with me about an idea called, "Math Cake Walk" - where students solve a problem, walk around a circle of numbers until the music stops, a number is randomly called and if the student on that number has the correct answer then they win.  My goal is to create such an activity around my current unit of study on system of equations to get students doing math problems with a slight twist to engage them.  


I encourage you to look at Eureka Math and ask yourself how can I make this engaging for students in a different and meaningful way?  I encourage you to work with colleagues in designing one activity that you can use this year and again next year.  I encourage you to slowly build your teacher toolkit with engaging activities so that after a few years you start to have a library of activities that you can use with your students.  I get that Eureka Math can be challenging in its presentation to students and I get that time is not a luxury we have - so start small otherwise it can be so overwhelming.


Please feel free to reach out with any questions as we continue to look for ways to engage our students during another year of a pandemic that impacts each and everyone of us on a daily basis.


Most importantly, give yourself grace and when you have done that then give yourself even more grace.


Teaching and still loving it,

Kevin Stott                         

De Anza Middle School    


Tuesday, November 9, 2021

Note Taking, Key Details, and Summaries OH MY!

Welcome back to another volume in the story of my life entitled “I’m not sure if this is how you are supposed to do it, but this is how I do it.”


I have taught 1st, 2nd, 3rd, and 5th grade. When I taught 5th grade, student writing on the SBAC was an area of growth and when I taught 2nd, I taught at an AVID school where notetaking was a huge focus. This has led me to my current approach which I have found successful. Note taking, summarizing, and synthesizing are all strategies that have been shown to boost student comprehension. My approach integrates all three and has helped students develop comprehension and writing skills.


So let’s get to it!


At the beginning of the week, students set up their notebooks with the Wonders Essential Question in a box at the top. As the week progresses, they add the title of each story and underline it to show it’s the title. They then take notes as we read, usually using the comprehension strategy of the week (cause and effect, problem and solution, etc) to identify key details in the text. At the end of the week, we synthesize the notes into writing as a way to cite text evidence and answer the Essential Question. 


By the third trimester, students are comfortable with this protocol and I leverage it for them to write informational research reports.


All still a little vague to you? Take a look at the work samples below for a better idea of what I mean.


So maybe in your next Wonders Week, try this out and see if it's a good ay for YOU to integrate writing into YOUR class :)


As I close, I invite you to join me in these affirmations.


I am safe.

I am loved.

I am powerful.


I'll be thinking of you,

Ruth Reinkymov

3rd Grade Teacher

Hawthorne IB World School


Thursday, October 28, 2021

What's So Great About Thinking Maps?

My name is Eric, and I’m a nerd. My nerdiness is vast, but I would like to believe its most useful manifestation is in the area of pedagogy. When it comes to teaching, the question that is constantly in the back of my mind is some version of, “Is there a better way to do this?” And the answer, invariably, is something like, “Yes, yes there is. There is an infinitely better way to do this, but it is going to devour most of your mental and physical energy for the foreseeable future.” To which I frequently reply, “Sounds great!” 

Over the course of the past decade, I have become convinced that Thinking Maps, in all of their various forms, are the most effective way to improve my instruction across all areas of the curriculum. Here, in my first post, I lay out several reasons the use of Thinking Maps should be considered foundational to your planning and teaching.

Metacognitive Purpose

According to the book Better Learning Through Structured Teaching, there are three domains in which teachers can establish a purpose for a lesson: content (subject matter), language (key terms), and social (SEL skills). To these, I would add a fourth domain: metacognitive. I strongly believe that if we want to develop our students into intellectually autonomous thinkers and learners, we need to teach them to reflect on their thinking and learning. Without a solid familiarity with the structures of cognition, students are unlikely to notice or comprehend what their brains are doing. 


Thinking maps allow teachers to seamlessly build these structures of cognition into lessons on a consistent basis by providing logical, easily recognizable frameworks for thinking. The content purpose of a lesson might be to teach students to provide reasons for their points of view, but a Left-Sided Partial Multi-Flow Map helps them to see the causal relationship between reasons and opinions, satisfying a metacognitive goal as well. An accompanying Tree Map makes clear that reasons need to be clarified and/or elaborated. A bank of words embedded in the map reminds students there is a set of terms associated with this type of thinking, and a well placed Blue Frame of Reference question (more on this in my next post), at the bottom of the map, can remind students to consider their biases when formulating an opinion and/or make a connection between opinion writing and the “Evaluate” level of Bloom’s Taxonomy.


Making Thinking Visible

I have determined that there are two main categories of Thinking Maps. The first is the student-generated map with which you are most likely familiar. This is the sort of map you ask students to create in order to plan a piece of writing or show their understanding of a particular lesson. The beauty of this sort of map is that it can show the teacher exactly what a student was thinking and how well they understood the task. A quick glance at a student-generated map usually allows a teacher to discern whether a student is on the right track. Did they put adjectives and adjective phrases in the bubbles on a Bubble Map or similarities in the central bubbles of a Double Bubble Map?


The second category of map is what I refer to as a “response map.” This kind of map permits me to show students what I am thinking. An example of this is a “Backstory Tree Map” I created for Literature Circles. As it happens, there are five techniques with which an author can provide backstory in a narrative. I made a Tree Map with five “branches,” one for each technique, and wrote hints on how to identify each technique on the lines below (on a digital version that could be written over or printed as directions). It was then up to the students to identify instances of backstory in their Literature Circle books and classify them appropriately on their Tree Maps. This map achieved the content purpose of helping students learn the five backstory techniques, but it also drove home the metacognitive point that the techniques should be considered distinct categories. 


Flexibility
Another of the many reasons I believe Thinking Maps should be foundational to your planning and teaching is their infinite flexibility. By this I mean that they can be used with any lesson, in any subject, at any ability level, throughout the teaching day. If your ELA, social studies, or science textbook requires students to complete a random, poorly designed graphic organizer, you can easily convert said graphic organizer into a Thinking Map. This might seem like an unnecessary bit of extra effort on your part, but it will allow students to connect the assignment to familiar modes of thinking, bringing down their affective filters and allowing them to focus on the content purpose of the activity. It also gives you the opportunity to raise or lower the rigor of the assignment using the techniques discussed in the next and final section.

Rigor

The best argument for making Thinking Maps integral to your instruction is the control they give you over the rigor of a lesson/assignment. You can easily build as much or as little scaffolding into a map as you deem necessary. 


One way you can do this is by raising or lowering the level of strategic thinking through your map selection. For example, I use three different maps for making text-to-self connections. The first, a Circle Map with a Frame of Reference, allows a student to connect any character in a story to any person in their life. Each connection can be about a different character and/or person, so it is very open-ended. The second map, a Double Bubble Map with only similarity bubbles, forces the student to make much deeper and more numerous connections since they have to choose one character and compare her/him to just one person in their life. The most rigorous text-to-self connections map I have created is actually a series of Bridge Maps which requires the student to make analogical connections, indirect connections which need to be explained in detail. With these three maps at my disposal, the same reading strategy can be practiced with significantly different levels of rigor.


In addition to map selection, you can adjust the rigor of an assignment by embedding more or less scaffolding in the boxes or bubbles of the map (see the above example of the Backstory Map).


Questions from the Metacognitive Frames of Reference are another way to raise rigor, but, since they will be the subject of my next blog post, I will refrain from discussing them until then. For now, I strongly suggest experimenting with using Thinking Maps as often as possible. I think you will find your comfort level will quickly improve. Hopefully, you will have a lot of questions for me in the comment section below!


Writing Every Day,


Eric Lovein


PS: Check out my post about Summarizing Flow Maps!: https://spotlightclassrooms.blogspot.com/2022/03/thinking-maps-for-fictional-narrative.html


...and my video on Circle Maps!:

https://www.youtube.com/watch?v=vuQ9RkXXZcI


Tuesday, October 26, 2021

Digging Deeper Into Learning Strategies: Close Reading for Exceptional Learners

 By Heather Pfrunder, M.A.Ed.   SDC Teacher and Education Specialist

October 25, 2021


The written word...oh how I love thee!  I could wax poetic for at least 5 pages on how much I LOVE reading, and even writing!  However, teaching this all encompassing and vital subject had me shaking in my boots as a new teacher.  There is just sooo much to cover.  In fact, my first several years of teaching I merely tested the waters of what I might explore versus really developing deeper strategies.  Upon my third school year teaching, and my first at OMSD, I really began to grow in this area.  However, implementing strategies which include writing to learn seemed daunting to students that barely acquired phonics skills and were challenged to learn vocabulary.   So I went down checklists: What do my students need to learn?  What is required that they have exposure and learn to use strategies comparable to their typical peers -- particularly AVID?  How do I select texts?  So hang tight - because this post has every resource I’ve ever created (and 2 I gathered) for ELA -- all downloadable!


What do my students need to learn? 


  1. A-typical/autistic students require visuals (i.e. pictures) to help them relate the written word to a concept.  This strategy is also helpful for students with cognitive delays or are Language Learners (that covers 100% of my students and probably a few of your students, too).

  2. Repetitive practice to understand the task demand so that they can focus on the actual learning/application of learning.

  3. Simplicity - while a concept can be complex to a degree, the format needs to be not too visually busy.


What Strategies Do I Need to Teach?


From a fundamental standpoint I need to address the following skills, as all reading comprehension rests on the following (and note - I usually teach them in this order):

  1. Wh- Questions

  2. Story Sequence

  3. Story Retelling

  4. Citing Text Evidence

  5. Identifying Themes

  6. Metacognition While Reading


Added to that are specific expectations of how learning should occur: AVID (i.e. column notes/WICOR, RACES, Thinking Maps, Costa’s Levels of Thinking), and of course, our district appointed curriculum: Wonders.


Starting with Wh- Questions, try using a mat to reference Wh- Mat Free Resource

Then break it down: Using a graphic organizer


This one I created. It has the blue shading because most of my students

are also challenged with their handwriting skills.


Story Sequence: For this one I typically start with taking pictures of the story.  Students can reference the book to match the order.  Notice the difference between the two sets of visuals: the one I used earlier in the year also includes the text for students to cite.  As they become more proficient, they are expected to find the words in the actual text:


Notice the Select Your Theme at the bottom? After a passage/story
review, they are given options to identify the type of story and the
change or significance of the story.
                                                                  

Story Telling: I created several versions of this graphic organizer, each version addressing Costa’s Levels of Thinking.  Below is the simple level one thinking.

Yup… I love the “Someone, Wanted, But, So, Then, Finally” format of story retelling.  You pretty much can’t go wrong with simple stories.  For added challenge, students really have to pay attention to time frames in a story if it starts with a “flash-forward.”


Citing Text Evidence:  Joint-attention is challenging enough when you are looking at a book and then worksheet to complete your work.  Add a graphic organizer on the wall to this, and well… who’s lost?  Everyone! Sigh… Solution?  Imbed the expectations right into the worksheet.  Make the worksheet a template and apply, and reapply… over time the concept is learned! Not only are we citing text evidence, but we are also reflecting on the Essential Question that is posed within the Wonders Curriculum.


Note: there are two different versions of this RACE and RACES - 

Start with RACE for beginning learners.


Identifying Themes: This always has me near tears.  Abstract concepts are so hard for my students to connect with!  But then I realized that the solution could be as simple as basic story themes themselves!  Aren’t common themes recycled in most literature?  Especially simple literature?  I started with Thinking Maps about story problems/solutions, and then after this reflection, the Thinking Map for Story themes became a matter of visual connect-the-dots.


Story Problems and Story Themes are laid out into Thinking Maps. 

While Thinking Maps are meant to help students organize their own thoughts,

Modeling with them also has benefits.


Metacognition While Reading: While all of the previous graphic organizers can address metacognition with additional visuals and check in’s, there is one strategy that made an amazing difference for my more advanced learners, and that is the CSR Learning Model. Of note that the CSR model is not only a reflection of reading comprehension, but done correctly, it is also done in collaboration with a peer.  So think about Kagan strategies in conjunction with this.  CSR stands for: “The Collaborative Strategic Reading (CSR) strategy incorporates cooperative learning, vocabulary development, questioning techniques, opportunities to practice, and students’ use of prior knowledge” (Per: nysrti.org/intervention-tools/reading-tools/tool:csr/).

In its simplest of explanations, students reflect on what they “get” or the “GIST” of a passage/story and what they “don’t get” or the “CLUNK” of the passage/story.  Often, this boils down to vocabulary or word usage.  And for this I like to use the Frayer Model to do a deep dig dive on a per student vocabulary.  What I love about this is that vocabulary learning now becomes not based on teacher assigned work, but student identified need.  By the end of the process/last multiple read students really have looked deeply into what the passage says.  (Of note: while this works for all texts, I really like to begin with non-fiction texts of interest, especially those with more academic words.)


This is a simple graphic organizer with the before, during, and after reflections. 


For more on the CSR model you can explore: https://iris.peabody.vanderbilt.edu/module/csr/cresource/q1/p01/#content


Everything I have shared and More can be downloaded here:

Close Reading Strategies for Diverse Learners


So at this point I have shared a lot of resources and strategies.  Hopefully one or more will help you and your students on the very long road to English proficiency.  While all of these resources are created to exist in conjunction with the texts, often the question lies in which text to pick -- after all the provided resources of Mc-Graw Hill’s Wonders program can seem like an ocean when prep time demands that you select from a more pond-sized selection.


How Do I Select Texts?


For this I am suggesting that selection is either for UA/ELD support or if you are in an SDC setting like myself - you are adjusting based on IEP goals. So here goes the short version at the end of a long blog post!


  1. I actually like the Phonics Readers to begin teaching how to use strategies.  The simple text helps students focus on the main points.

  2. From there I go to the Anthology texts using the above shared graphic organizers.  I focus on main events and new vocabulary. I typically begin each story with a short video clip to introduce the topic and/or vocabulary slides.

  3. From there I go into using the Close Reading Companion (Grade 1-2) or Wonderworks (Grades 2- and beyond): story selections are vocabulary rich, with visuals, and tend to be slightly shorter than the Anthology.  I shift to this resource because the embedded questions on the page are much easier to navigate but are also complex enough to challenge and expand their understanding beyond the initial graphic organizers I have shared. Additionally, students can underline not only the work cited, but the key words in the questions being asked.


Over the years I have used supplemental resources (as found on teacherspayteachers.com) or programs like “Read Naturally,” but the idea is that students have access to high quality texts and are commensurate to their typically developing peers.  In this, adapting strategies to work in conjunction with the Wonders curriculum not only meets the unique needs of the students, but allows them access to the general education curriculum.


Like what you read?  Join me in upcoming blog posts where I continue to put these strategies into place and share resources!


Friday, October 15, 2021

Top 5 Reasons To Use A Visual Schedule


When I tell people I devote an entire white board to my daily schedule, they look at me like I’ve lost it. Why devote such valuable real estate to something so simple? Read on for * reasons why I strongly advocate for the use of a visual schedule in the classroom.


1. Predictability

Students know what is expected of them when. As children, they have very little control over their lives and with anxiety on the rise, adding this bit of predictability to their day helps students feel less stressed and more prepared to face the day. 


2. No more “What time is _____?” and “Are we doing _____ today?” etc.

I feature a digital clock next to my analog clock to help students identify exactly when we will be doing what. In the first couple of weeks, students will still ask and I will direct them to the schedule.


3. Learning targets and page numbers

Again, students know what to do. They can easily look at the clock, look at the schedule, and determine what subject and page number we are on. It also helps me by ensuring I highlight the learning target which has embedded IB Language.


4. Models time management and builds table reading skills

Students can see I pace my lessons according to how much time we have for each task. I tell students to “move with urgency” as we transition from task to task and they can see what they are expected to move on to next. Essentially, it’s a visual representation that even though we DO have all day, we DON’T have all day for Math or Writing and they need to focus on the task at hand.


5. Functions as an Emergency Sub Plan

I’ve had many unpredicted absences and writing out my schedule before I leave for the day ensures that no matter what, the day will run smoothly.


And there you have my top 5 reasons to utilize such valuable classroom real estate to a schedule because, really, it’s SO much more than a schedule.


As I close, I invite you to join me in these affirmations.


I am safe.

I am loved.

I am powerful.


Here for you,

Ruth Reinkymov

3rd Grade Teacher

Hawthorne IB World School


Most Viewed Posts