Showing posts with label Technology. Show all posts

Monday, December 6, 2021

The Meta-Cognitive Frames of Reference: Taking Thinking Maps to the Next Level (Part 1- The Green Frame)

I have a confession to make: When I was first introduced to Thinking Maps around fifteen years ago, I was completely unimpressed. I dutifully hung them on my wall and promptly forgot all about them, except on the occasions when I needed to temporarily take them down to make room for art projects. I maintained this insouciance for many years.

In 2011, I was sent to the Write from the Beginning (The Thinking Maps-based writing program) training offered at the Hardy Center. I immediately found the logical, intuitive structure of the program captivating, and I began to suspect I had missed something important about the bland-looking graphic organizers on my wall. I lobbied my principal for more training on Thinking Maps, which eventually led to multiple visits to our school by an incredibly knowledgeable trainer named Kristin Clark. One of the first things Kristin did was explain the crucial role of The Meta-Cognitive Frames of Reference in the proper use of Thinking Maps, and I eventually came to realize that they were the secret ingredient that unlocked the true potential of the maps.

The Frames of Reference are a series of color-coded questions that students should always ask themselves about their Thinking Maps (or any other thinking/reading/writing they are doing). Each colored category (green, blue, and red) is a major question, which is then broken into six detailed supporting questions (See the Tree Map below). These questions, in their original form or as content-specific variations, can and should be layered onto Thinking Maps for students to answer before, during, or after they have done the required thinking.


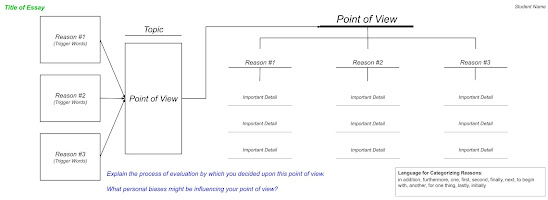
As you can see in the above graphic, the three question categories are as follows:

Green: Where did you get the information in your map?

Blue: What is influencing the information in your map?

Red: What conclusions can you draw from your map?

All of these questions will help you address important learning targets and standards across the curriculum. In my next few blog posts, I will cover each one in detail. Let’s start with the Green Frame!


The Green Frame: Where did you get the information?

Anyone who has ever administered a performance task knows that this question can make or break a student’s response. If the student is supposed to use a series of sources provided in the task, but instead relies on their prior knowledge, they are finished before they begin. The Green Frame question teaches students to distinguish between two possibilities, posed in the form of supporting questions:

Is the information based on your prior knowledge?

or

Did the information come from a specific source?

Obviously, the goal should be for kids to contemplate these questions before they begin thinking, but even answering them after the fact can help them build awareness. It is, of course, possible that some of the information in their map could come from their prior knowledge while other information comes from a specific source; an example would be a map of inferences about a story in which the student combines text evidence and prior knowledge. 


Prior Knowledge

If the information in a student’s map is based on their prior knowledge, there are a couple of follow-up questions they can use to more specifically identify the type(s) of prior knowledge with which they are working:

What personal experience have you had with this concept or topic?

and/or

What background knowledge do you have that could relate to this concept or topic?

One of the many aspects of the frames that I love is how they encourage precision of thought. By differentiating between personal experience and background knowledge, these questions lead students to consider exactly where their knowledge comes from. Is this something that has happened to you, or did you learn about it second-hand? 


The prior knowledge side of the green frame can also be used in writing instruction. Personal experience and imaginative narratives rely heavily on a writer’s prior knowledge, as do the various types of “Explain Why” writing (opinion, point of view, argumentative). Matching genres to information sources can help students create mental templates which can come in handy when responding to writing prompts.


Specific Sources

The other side of the Green Frame is perfectly suited to all things Common Core. The guiding question is: Did the information come from a specific source? Our standards are awash with mentions of using and/or citing text evidence. The consistent use of the accompanying follow-up questions is a fantastic way to ensure you are regularly requiring students to employ these skills:

What are the specific titles, page numbers, web addresses of the sources you referenced?

and/or

What specific textual evidence can you cite to support your inferences?

Needless to say, the use and citation of text evidence are essential academic skills with applications throughout the curriculum. As I mentioned above, the CAASPP performance tasks usually involve the use of specific sources. Many types of expository writing prompts (to Explain Why, to Report Information, and to Explain How) often call for the use of text evidence, and there is even a research grade on our report cards.


Uses and Examples

The Green Frame of Reference has become part of my classroom curriculum. In other words, I teach it explicitly throughout the year and it is the inspiration for many mini-lessons. I have even gone so far as to use green font on the maps I create to designate any places where students should consider the source of their information (including the titles of sources, text evidence, etc). 


Focusing on the Green Frame affords a teacher the opportunity to address important standards in writing, grammar, punctuation, social studies, reading comprehension, and just about any other subject across the curriculum. Students can be taught to use personal examples such as anecdotes, personal experiences, and the experiences of others to support reasons in “Explain Why” writing. Verbs of attribution, along with other language used to acknowledge sources, can and should be taught in conjunction with the concept of citing text evidence. Direct and indirect quotes and their proper punctuation are also logical topics of instruction in this context. In the study of history, sources are everything; the Green Frame questions about citations look like they’ve been pulled from a history class syllabus.


My reading comprehension strategy and skill maps are often covered with green font. This is my way of constantly reinforcing the need to consider sources of information (See the “Dramatic Structure Summarizing Flow Map” for an example).


I have an entire wall of my room devoted to the Meta-Cognitive Frames of Reference. This serves two purposes. First, it ensures that I never forget to weave the Frames into my instruction. More importantly, it allows my students constant access to these critical tools. In my next post, I will address the Blue Frame, which is the most cognitively challenging and game-changing of the frames. Please help continue the conversation by including any questions or suggestions in the comment section below!


Here are the links to my other two posts about the Frames, along with one about the importance of Thinking Maps:

Blue Frame: https://spotlightclassrooms.blogspot.com/2022/01/the-meta-cognitive-frames-of-reference.html


Red Frame: https://spotlightclassrooms.blogspot.com/2022/02/the-meta-cognitive-frames-of-reference.html


What's So Great About Thinking Maps?: https://spotlightclassrooms.blogspot.com/2021/10/whats-so-great-about-thinking-maps.html


Writing Every Day,

Eric Lovein


PS: Check out my post about Summarizing Flow Maps!: https://spotlightclassrooms.blogspot.com/2022/03/thinking-maps-for-fictional-narrative.html


...and my video on Circle Maps!:

https://www.youtube.com/watch?v=vuQ9RkXXZcI


Thursday, October 28, 2021

What's So Great About Thinking Maps?

My name is Eric, and I’m a nerd. My nerdiness is vast, but I would like to believe its most useful manifestation is in the area of pedagogy. When it comes to teaching, the question that is constantly in the back of my mind is some version of, “Is there a better way to do this?” And the answer, invariably, is something like, “Yes, yes there is. There is an infinitely better way to do this, but it is going to devour most of your mental and physical energy for the foreseeable future.” To which I frequently reply, “Sounds great!” 

Over the course of the past decade, I have become convinced that Thinking Maps, in all of their various forms, are the most effective way to improve my instruction across all areas of the curriculum. Here, in my first post, I lay out several reasons the use of Thinking Maps should be considered foundational to your planning and teaching.

Metacognitive Purpose

According to the book Better Learning Through Structured Teaching, there are three domains in which teachers can establish a purpose for a lesson: content (subject matter), language (key terms), and social (SEL skills). To these, I would add a fourth domain: metacognitive. I strongly believe that if we want to develop our students into intellectually autonomous thinkers and learners, we need to teach them to reflect on their thinking and learning. Without a solid familiarity with the structures of cognition, students are unlikely to notice or comprehend what their brains are doing. 


Thinking maps allow teachers to seamlessly build these structures of cognition into lessons on a consistent basis by providing logical, easily recognizable frameworks for thinking. The content purpose of a lesson might be to teach students to provide reasons for their points of view, but a Left-Sided Partial Multi-Flow Map helps them to see the causal relationship between reasons and opinions, satisfying a metacognitive goal as well. An accompanying Tree Map makes clear that reasons need to be clarified and/or elaborated. A bank of words embedded in the map reminds students there is a set of terms associated with this type of thinking, and a well placed Blue Frame of Reference question (more on this in my next post), at the bottom of the map, can remind students to consider their biases when formulating an opinion and/or make a connection between opinion writing and the “Evaluate” level of Bloom’s Taxonomy.


Making Thinking Visible

I have determined that there are two main categories of Thinking Maps. The first is the student-generated map with which you are most likely familiar. This is the sort of map you ask students to create in order to plan a piece of writing or show their understanding of a particular lesson. The beauty of this sort of map is that it can show the teacher exactly what a student was thinking and how well they understood the task. A quick glance at a student-generated map usually allows a teacher to discern whether a student is on the right track. Did they put adjectives and adjective phrases in the bubbles on a Bubble Map or similarities in the central bubbles of a Double Bubble Map?


The second category of map is what I refer to as a “response map.” This kind of map permits me to show students what I am thinking. An example of this is a “Backstory Tree Map” I created for Literature Circles. As it happens, there are five techniques with which an author can provide backstory in a narrative. I made a Tree Map with five “branches,” one for each technique, and wrote hints on how to identify each technique on the lines below (on a digital version that could be written over or printed as directions). It was then up to the students to identify instances of backstory in their Literature Circle books and classify them appropriately on their Tree Maps. This map achieved the content purpose of helping students learn the five backstory techniques, but it also drove home the metacognitive point that the techniques should be considered distinct categories. 


Flexibility
Another of the many reasons I believe Thinking Maps should be foundational to your planning and teaching is their infinite flexibility. By this I mean that they can be used with any lesson, in any subject, at any ability level, throughout the teaching day. If your ELA, social studies, or science textbook requires students to complete a random, poorly designed graphic organizer, you can easily convert said graphic organizer into a Thinking Map. This might seem like an unnecessary bit of extra effort on your part, but it will allow students to connect the assignment to familiar modes of thinking, bringing down their affective filters and allowing them to focus on the content purpose of the activity. It also gives you the opportunity to raise or lower the rigor of the assignment using the techniques discussed in the next and final section.

Rigor

The best argument for making Thinking Maps integral to your instruction is the control they give you over the rigor of a lesson/assignment. You can easily build as much or as little scaffolding into a map as you deem necessary. 


One way you can do this is by raising or lowering the level of strategic thinking through your map selection. For example, I use three different maps for making text-to-self connections. The first, a Circle Map with a Frame of Reference, allows a student to connect any character in a story to any person in their life. Each connection can be about a different character and/or person, so it is very open-ended. The second map, a Double Bubble Map with only similarity bubbles, forces the student to make much deeper and more numerous connections since they have to choose one character and compare her/him to just one person in their life. The most rigorous text-to-self connections map I have created is actually a series of Bridge Maps which requires the student to make analogical connections, indirect connections which need to be explained in detail. With these three maps at my disposal, the same reading strategy can be practiced with significantly different levels of rigor.


In addition to map selection, you can adjust the rigor of an assignment by embedding more or less scaffolding in the boxes or bubbles of the map (see the above example of the Backstory Map).


Questions from the Metacognitive Frames of Reference are another way to raise rigor, but, since they will be the subject of my next blog post, I will refrain from discussing them until then. For now, I strongly suggest experimenting with using Thinking Maps as often as possible. I think you will find your comfort level will quickly improve. Hopefully, you will have a lot of questions for me in the comment section below!


Writing Every Day,


Eric Lovein


PS: Check out my post about Summarizing Flow Maps!: https://spotlightclassrooms.blogspot.com/2022/03/thinking-maps-for-fictional-narrative.html


...and my video on Circle Maps!:

https://www.youtube.com/watch?v=vuQ9RkXXZcI


Wednesday, December 9, 2020

Formative Assessment using Quizizz

Formative assessment during distance learning has not been the most straightforward task to accomplish. I've been searching for formative assessment strategies that improve and guide my instruction and student learning. Let's get real. Daily formative assessment is challenging. It takes time, a little thing that we lack as teachers, especially online. But it is so worth it! If you use formative assessment, review the data, and use it to help guide your instruction, you will see instant results with student learning and success in your classroom. Secondly, we all know that student engagement is a hurdle that we all continue to face. Why are these our struggles? One – The lack of physical proximity. We are not able to get instantaneous feedback on the effectiveness of our teaching delivery. Two – One cannot control the student's house's environment to ensure 100% attention to the virtual class.


Today I'm going to share my favorite "techy" formative assessment/engagement resource with you that has made my life so much easier. 
Quizizz!

Quizizz is an easy way to make formative assessments exciting and engaging for your class. It is very similar to Kahoot, but it has a little more flexibility and versatile usage options. The difference between Kahoot and Quizizz is that Kahoot must be teacher-led, and kids see the questions and answers on the board and use their devices to select an answer. Quizizz, on the other hand, can be self-paced, and the students will see the questions and answers on their own devices.  

How does Quizizz work?
Teachers log into Quizizz http://quizizz.com/signup with their Google account and view a library of public quizzes. You can search for quizzes by the name of the subject. One of the coolest parts about Quizizz is that you can search for premade quizzes or create your own. Why re-create the wheel when someone has done the work for you!? When you log in, you default to the public section, which allows you to search. 

Then hundreds of quizzes about your topic will pop up. Once you've picked a quiz, you can conduct it in class in live mode or assign it as an asynchronous activity for students to practice on their own time. I share the link with my first graders via Lanschool, and they can immediately join the quiz.  

My favorite feature is the questions can be asked in various ways from multiple choice, checkbox, fill in the blank, poll, or open-ended.   


Here are the reasons I choose Quizizz above other quiz apps.

1. Students can view questions on their computers


Here's why I think this matters

  • My students don't have to switch between my screen and theirs during this activity, eliminating students from accidentally logging off.
  • My students are engaged directly with the question and answer options that reinforce the content taught to make it easier to read and allow students to enable device-level read-aloud if they need it.
Image for post


2. My students can join the link and skip the code entry step to save time and sanity. Just click on "share via" on the join screen to generate a join link.
  • I share this via Lanschool, and my students can join with a click instead of asking me to repeat the code out loud several times.
  • If wifi issues are slowing someone down, my students can join the quiz after it's begun.
Image for post


3. I can quickly bring the attention back to my screen to review results together during or at the end of the entire quiz. 
  • I can choose from various settings like whether to show the answers in-game or post-game, set a question timer, show leaderboard (which infuses competitive spirit and keeps students on their toes).  
  • During the quiz, students see the questions and answers on their screens. On your teacher account, you will see a leaderboard and each student's progress. You can choose to display this on the screen while the students are playing or only view yourself. 
  • There also is an instructor-paced mode so that you can pause for discussion between questions.

Image for post

Ideas to jumpstart your first Quizizz:


  • Start a discussion with a poll question.

  • Create a quiz based on an engaging audio or video clip.

  • At the end of a lesson, use an open-ended question to gather feedback.

Here is a quick video on my class answering a Quizzizz question...


Positively Teaching,  
Randi Muehlen

Friday, May 1, 2020

Bring some " sparkles" with Google Chrome Extensions


What in the world are Google Chrome Extensions? These extensions are software you can install within your Chrome browser that allows you to run other services in the browser.  It sounds super complicated and you might think, “ why would I need these extensions?” Well my friends, I am here to share some extensions I use especially during distance learning.  

First things first, adding Google Chrome extensions is so easy and FREE! If you don’t use chrome I highly recommend downloading it to use as your web browser. Personally I use my Mac at home but I go back and forth using Safari and Chrome to achieve specific tasks.  You can add extensions with just 2 quick clicks! Here are my favorite Chrome Extensions for Distance Learning!

  1. Screencastify - Right after the PD from Jeff Quick on Screencastify, I downloaded the extension and it has been super easy to use instead of having to record myself in Zoom, waiting for it to download, edit in iMovie before I can upload it on to Drive.  This program easily record your screen, yourself, or both! Not only does it save directly into your Google Drive, I also love how you can directly add it to your Google Classroom! 
  1. Bitmoji -This is my FAVORITE Chrome extension. Long gone are the days of emailing your Bitmoji from your phone to your email on your laptop and having to maneuver the Bitmoji with the set background around.  Within this extension, your Bitmoji will have a translucent background, which means, you can place it anywhere you want and it would have that pestering white or black background blocking your content. I love using Bitmojis. Here are some of my favorite ways to use this extension:
  • I put Bitmojis on my daily message slides I share on Class Dojo and Google   Classroom. My students LOVE this!
  • I insert Bitmojis on student’s work. It acts like a digital sticker.  You can search for Bitmojis with the extension and then just copy and paste them  or click and drag right into the Google slides, powerpoint or even the student’s work in Google classroom. It becomes a digital sticker when I use it on students' work.  


3)  Emoji Keyboard – Use this extension to add emojis to your announcements, slides, or Google Classroom! So easy and your students will love it! I use it for changing Google Classroom topic names! Anything to give our students some giggles and excitement to push through this last month fo distance learning. 


4) Custom Curser Make your curser something fun for your online class meetings or screen recordings! We have to get that motivation going any way possible. 


5)  Google Keep- Organize your notes and to-dos by category! You can even color code and add your own labels. You can access it from your computer, phone, or even your apple watch! Game Changer!


6) Full Page Screen Capture Easily take a screenshot of your screen or browser with one click! 


I hope these extensions will help motivate your students to continue with distance learning and also help you with some productivity and some silliness! 

Bitmoji Image

HAPPY TEACHING!
Eileen Wunderlich 


Wednesday, April 15, 2020

Integrating Annotating & Screenrecording Simultaneously in Distance Learning

If Only. These words seem to pass my mind more and more each day as we continue down the path of distance learning. If only I had grabbed my document camera and ten other things from my classroom.  If only that student didn't miss that Zoom lesson when I explained that question in depth.  If only I could adequately explain these steps clearly to the student when they can't see what I am referring to on their page at that moment.  If only I could get the right angle or keep the camera straight while trying to record something for my kids. If only I could write neater and meet the time limit when I screen record my computer. If only there were a way to deal with all of these problems that continue to arise. Well, lucky for you- there is! The solution is on the tips of our fingers-literally! With the pairing of screen recording, digital documents (photos, pdfs, internet), and your unique teaching style on your apple device- you have just created your smartboard on the go. I loved screen recording my laptop screen, but hated how my writing was so awful you couldn't tell what I was doing. Now you can annotate and create mini-lessons/ explanations to support your students straight from your phone. Trust me its easier than it seems!

Reclaiming Your Teacher Voice in Remote learning
One lesson that distance learning has taught me is how much I genuinely miss getting in front of the class each day and teaching. I loved being able to put my unique spin on how I would teach kids or what I want them to understand. In a sense, I feel like I have lost a bit of that- sure everything I assign shows who I am but usually its other videos or links that are teaching the concept-not me. I can't tell you how many times I have searched for videos and can't find one that has EVERYTHING I wanted to say, or I can't find one at all that I think would help my students with a specific problem. These are the moments that I wish that I could be teaching them- without any time constraints or fear that my writing wouldn't look nice. Learn how to change that by watching the video to start. 


Annotate? Screenrecord? or BOTH! 
As you can see you have the option of doing one of the other or both. If you would just like to annotate- simply just take a picture or share your document afterwards. A few ways to incorporate these skills during distance learning is:

  • Using a students written response as a mentor text
  • In detail explain the steps of a math problem
  • Deeply explain the rubric that you have attached on your assignments
  • Provide feedback on an exit ticket 
  • Add a post to Class Dojo to better explains to parents and students how to navigate new information (I do this all the time-this is difficult if you do a screen recording on your laptop - works like a charm and helps parents who don't want to read a long post)
  • Add feedback for a student on Class Dojo Portfolios
  • Create your own mini lesson for whatever subject  you would like
  • Record an already published video you want students to watch - and pause to clarify what students just watched in the video you may have linked
  • Create a series of mini video recordings to form an iMovie and/or slideshow
  • Teach students how to do this for more complicated problems that exceeds the Flipgrid time slot

This list exceeds far more than what I have written. So try it out- you won't be sorry! 


Lively Teaching

Jessica Magana

Most Viewed Posts