Showing posts with label middle school. Show all posts

Friday, March 17, 2023

Literature Circles: Paper Trays and Protocols

This is the third in a series of blog posts about Literature Circles. You can find the other posts on my Spotlight webpage. My previous submission covered how my Literature Circle students select the books they will read during a three-week cycle and how they create schedules of which pages they will read each night and which roles they will be responsible for during each of the seven meetings they will hold with their group members during that time. I will now turn to how I distribute and collect the work the students do for their various roles and how the Literature Circle meetings are organized and managed.


The Organization of Digital and Paper Resources

As I have discussed in previous posts, there are four distinct roles that students perform during a Lit Circle meeting. From suite to suite and meeting to meeting, roles can vary, so students need to be provided with instructions for their particular roles for each meeting. I do this in two ways. First, I provide instructions for each role in a posting about the upcoming meeting on Google Classroom. In addition to these instructions, students are given access to digital versions of the thinking map jobs that are to be completed for each role. Often, there are also sample maps and other resources included in this space to help them complete their jobs (You can see examples of all of this in the image below). Posting the job sheets and resources digitally ensures that students have access to them even if they are absent or have misplaced their paper copies.


Due to the fact that many students do not have consistent access to computers or printers when they are not at school, I also provide each student with a paper copy of the instructions for their particular job. In the back of my classroom, there is a table with various stacks of paper trays atop it. One set of trays contains all of these instructions, along with any other necessary resources (such as tips on how to identify major events in a narrative). 


On the first day of a new Literature Circle cycle, students go back to grab these resources one job at a time. The same routine is followed at the end of each meeting because each student will perform a different role at the following meeting two days later (and because at least two of the Thinking Map jobs change for each meeting).


Meeting Protocols

One of my first priorities at the beginning of each school year is to teach my Literature Circle students how to transition to and operate within a meeting. This might sound like simple stuff, but, as I always tell my kids, if the meetings don’t look and sound right, they probably aren’t going to function well. In fact, I often spend the first three-week cycle of Literature Circles solely focusing on the procedures and protocols discussed below, and I use fishbowls to teach and reteach them throughout the year.


On the day I announce which books students will be reading, I also provide each group with a number. These group numbers correspond to numbers I have written on little stickers on the ceiling above various open spaces around my classroom. I have made sure each open space is far enough away from the other meeting locations to allow each group to have a private conversation. Students are instructed to walk to their designated meeting spot and locate a nearby chair (as opposed to dragging their own chairs across the room).

Once all the group members have arrived, the student fulfilling the Discussion Leader role (a job that involves writing questions based on the six levels of Bloom’s Taxonomy) checks to make sure that everyone has come prepared with their books and completed Thinking Map jobs. The Discussion Leader then reviews the SOLAR protocols. SOLAR is an acronym that stands for:

S- Square off: Sitting in a square (meaning the feet of each chair touch the feet of the chairs on either side of it)

O- Open: Bodies facing each other (meaning each student should face the student across from them with their shoulders equidistant from the shoulders of the kids on either side)

L- Lean: Leaning in (I like to use a yardstick to show them how much closer they are to each other when they lean in instead of leaning back. This makes it much easier to use private voices.)

A- Attend to others: Pay attention

R- Respond: One at a time


Once everyone is sitting properly with their books and work in hand, the meeting begins with the Summary Specialist performing their role (I have already discussed this role in detail in a previous blog post). The logic behind beginning with the Summary Specialist is that it helps to make sure everyone agrees on the major events they have read about in the preceding two days before diving into the finer points of the story. As is the case with all of the other roles, the Summary Specialist’s job is not to simply read the contents of their completed thinking map to the group. Instead, they are expected to elicit a summary from the other three group members. I have included Reciprocal Teaching Protocols at the bottom of each set of instructions so that students can rehearse what they will say when it is their turn to be the “teacher” (You can see an example in the following image). 

Once the Summary Specialist has completed their role, the Discussion Leader takes their turn, followed by the Thinking Map Strategy and Thinking Map Skill students. When the meeting has come to an end (I usually allot about 20-25 minutes depending on the circumstances), the Discussion Leader collects everyone’s work and puts it in a paper tray labeled with their corresponding group number. Students then take turns walking over to the paper tray table to grab their job sheets for the next meeting (assuming the completed meeting was not the last one in the cycle). 


The contents of the various Thinking Map jobs students do to prepare for their Literature roles will be discussed in future blog posts. Please check back frequently for updates!


Writing Every Day,

Eric Lovein
Monday, February 28, 2022

Assessing Spring Assessment Readiness

By Heather Pfrunder, Doctoral Candidate, SDC Teacher, and Education Specialist

February 28, 2022


Assessment ready or standard’s ready? Are we making students ready for life by maximizing instructional minutes? Often the answer is yes. During testing season it seems like the answer is… well… testing. However, if we address metacognition skills with test preparation, our students are becoming equipped with learning to perform under pressure.  Let’s look at how.


  1. Spiral Review and the Standards.


While the first objective seems pretty obvious, it really piggy-backs onto my previous article about maximizing spring growth. In a year with so much change, transition, and re-learning educators have had to rethink lessons into spiral review formats. Assessment prep is simply one more tool to refine this practice. Taking time to review objectives and test formats informs instructional minutes, especially during intervention periods. Looking over the practice test questions and formats are not only for students, but a great tool for educators in knowing how to prep students.


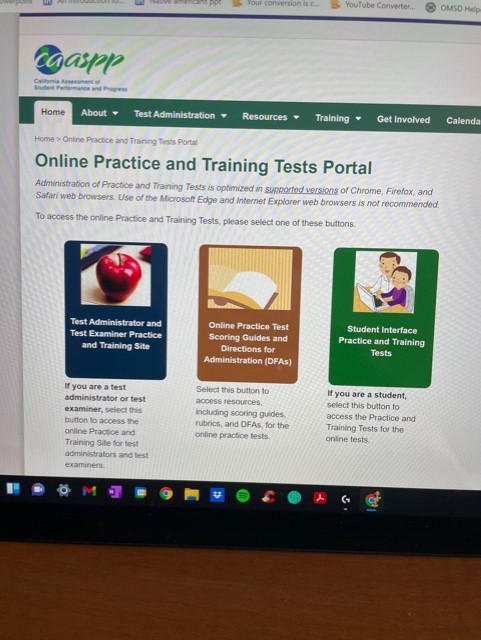
In the caaspp website teachers can review tests 

and set students up with practice test opportunities.


  1. Mindfulness and Testing


Slowing students down to breathe and focus on clarity of thought is the first step to effective test-taking skills. It also replicates needed life skills. From driver’s tests to college exams to employment tests, much of what we do in life is dependent on effective test-taking skills. Practice breathing and focusing on the question or the topic. Practice will assist students with more effective management of their emotions. Controlled breathing is a good base of ensuring heart-rate and oxygen to the brain. As a daily specific practice before practice testing, we are setting students up with a natural association of calming and test-taking strategies. Practice videos are available in our SEL toolkit, or simply click this link here.

  1. What is the question asking?


Really? Yes, really. So often in their anxiety or eagerness to quickly complete the test students forget to go slowly and really look at all the keywords of the test. Just as we expect our students to circle, box, or highlight answers, it is equally important to circle, box, or highlight key words and compare answers to the questions. While several words are bolded and underlined by caaspp, students can practice using the mousepad to highlight additional question details. An additional effective test-taking strategy is to look at the questions before reading the passages, when allowed.


Have students practice using their mouse or keypads to 

highlight key words in questions and in the text.


  1. What tools do I use?

Chances are if your students aren’t using tools, they really are not answering to the best of their abilities.  Simple things like thinking maps on paper or using an allowed 100’s or multiplication table can make the difference between making senseless errors and demonstrating true abilities. Do not assume that months of “Read, Draw, Write” or “STAR” note-taking means they will automatically use these tools in a testing environment. When you practice pre-testing observe: do your students use the tools, or do they know how to make their own? If pencil and paper are allowed for scratch paper do they know that they can draw a simple number line to add and subtract? Having students practicing these skills prior to assessment not only means that they have strategies for test-taking, but they are able to practice problem solving skills for daily assignments. Sometimes a little explicit instruction is just the boost your student needs.


If digital tools are not available, have students practice creating their own.

Practice using pre-writing strategies they have been practicing.


Until next time, wishing you the best and may your students’ testing odds ever be in their favor…


Like what you read? Join me in upcoming blog posts where I continue to put these strategies into place and share resources!


Friday, January 28, 2022

Springing into Action: Maximizing Spring Growth

By Heather Pfrunder, M.A.Ed, SDC Teacher and Education Specialist

Jan 28, 2022


Post Winter Break is always the most exciting time of the year.   Students are in the FLOW of learning; all the pesky practices of getting used to the routines are out of the way and we simply get down to the business of learning.  It’s the time where we often see the bigger payouts for our efforts and strategies. It is also the time that can quickly get sandwiched between assessments and special projects.  However, careful attention to student progress monitoring can be the difference between meeting student goals/standards and leaving learning roll-over for summer school or the following fall. So, let’s get to it in three steps!  The following link is the organizer I have created for use.  Classroom Monitoring Worksheet How to use it is below.

**(Note: you will need to make your own copy of this document to edit it).


Step 1: Survey Student Skills

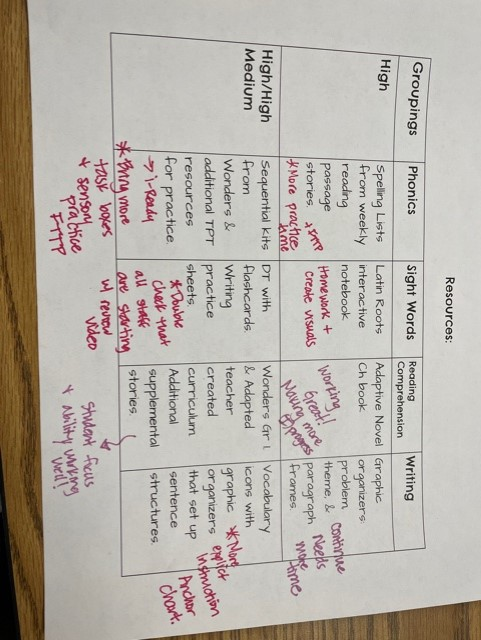
The first step seems the most challenging, but simply look at assessments and class work.  Summarize what you see and what you know from interacting with them.  Cover each basic aspect, where are they at? What objectives are they working on?  The sample I chose from my classroom is as follows: ELA: Phonics (or spelling), Sight Words (or Latin Roots), Reading Comprehension, and Writing.  For Math: Algorithms, Measurements & Graphs, Fractions & Decimals, Geometry, and Word Problems.  This may look different for your grade level or your teaching subject. Tweak what you need adjusted to match state standards and goals from your class/subject.


Step Two: Re-Organize Your Intervention Groups.

Students grow and their needs shift through the year.  Being responsive to that means that you are placing them in a place where they can collaboratively work and grow.  In the image above I have separated my students to look at what work I need them to accomplish.  However, knowing that some students may have difficulty interacting with particular individuals means my students will be regrouped differently despite ability - thus the penciled info!  Revisions are in progress!


Step Three: List and Review Your Resources

Listing out your current resources helps you to frame that every need is covered.


 The important part is reviewing what is working and what is not.  What could use more attention?  Why?  More interactive lessons?  More practice?  A different program or strategy?  Maybe time needs to be shifted to a particular skill.  Here I have added notes about more intervention time with Fast Track To Phonics, videos, revised anchor charts, homework opportunities, and notes to myself of what is working great (i.e. consistent progress at an appropriate pace). Now, it’s lesson planning time. 


Wishing you and your students AMAZING Spring Growth!!


Like what you read? Join me in upcoming blog posts where I continue to put these strategies into place and share resources!


Tuesday, April 28, 2020

Providing Feedback to Students from a Distance


Providing meaningful, timely feedback is critical to student success and can significantly enhance student learning. When teaching a new skill, feedback is needed for students to understand what they are doing well and what they need to improve on. In a perfect world (a.k.a not the world of distance learning), I attempt to provide feedback within 24 hours. When the assignment is fresh in their heads, the input means more. The feedback can be used  to make their product better before they turn the assignment into me. I’ve noticed if I wait to give feedback, the student is already on to another assignment, and in many cases, they don’t even read the comments I leave.

You can communicate feedback in a variety of ways. In the classroom, I like to hold writing conferences with students individually. During this time, each student would read a portion of their essay (or product) to me aloud, and we would discuss what works and what doesn’t work. One of the (many) drawbacks to distance learning is that I am not able to conference with students individually. So instead, I’ve needed to look into new ways to provide quality feedback to my students.

In doing research, I found many feedback tools that I am excited to try out, but for the sake of quickness and ease, I decided to start by providing written feedback through Google Classroom. When grading an assignment in Google Classroom, there is a comment bank section. The comment back section “follows” you in any of the classes you create in Google Classroom, and you can build it as you go. For example, at the beginning of the year, you may want to start with simple feedback (punctuation and organization), and as the year progresses you can add comments that you’ll be grading them on or that you just taught (academic language or reminding them to add commentary). The feedback can be used to help students notice what they are doing well and what they need to improve.

Using the comment bank during distance learning has helped me communicate feedback with my students throughout the week in a quick and meaningful way.
Here is how you start a comment bank:
  1. Open any class in Google Classroom in which you are a teacher.
  2. Go to any assignment (cannot be a question, material, etc.) you have assigned where at least one student turned their work in through Google Classroom.
  3. Click on the comment bank icon on the right-hand side. The first time you open this icon a tutorial will pop up to walk you through the rest of the steps.
  4. Click on Add to bank.
  5. Lastly, type in the feedback you want to give to students and add them to the bank

Using the comment bank has helped me so much over the past couple of weeks. I hope it helps you too!
Jenni Merry


Thursday, January 23, 2020

What's Going On in This Picture?

What's Going On in This Picture? November 2019

 Ever find those million-dollar resources and think to yourself, “Where have you been my whole teaching career”? About a month ago, I was scrolling/doing some research/professional development on social media when I came across this teacher discussing how excited she was for the “New York’s Time’s” newest “What’s Going On in This Picture?” I was intrigued right off the bat, so I clicked on the link to learn more. What I found made me so excited that I put it into practice the very next day in my classroom.

“Look closely at this image, stripped of its caption, and join the moderated conversation about what you and other students see.”

-What’s Going On in This Picture?
“What’s Going On in This Picture?” can be found in The Learning Network section of the “New York Times.” Every Monday, a collaborator from Visual Thinking Strategies posts a fascinating picture without a caption attached. Along with the picture, there are three questions posed to the students: 1) What is going on in this picture? 2)What do you see that makes you say that? 3)What more can you find? Students are asked to think about the questions and then answer them on a digital platform while conserving with students around the country. (note from the site: Students 13 and older are invited to comment, although teachers of younger students are welcome to post what their students have to say.) On Thursday afternoons, the site reveals more information about the photo and gives students the chance to reflect on how reading the caption and learning its back story helps them to see the image differently.

Comment posted on picture above
The two aspects I most love about this activity is that students work using a digital platform. This way, students from anywhere can communicate and discuss open-ended topics with each other. With this activity, students can learn multiple perspectives in such an authentic way. The first time I used them in class, we had a chalk talk with archived pictures. I posted the three questions from the site on the whiteboard, and each student walked around and commented on as many images as they could in six minutes. Then I choose the one that had the most comments on it, and as a class, we discussed the different perspectives people had in just our classroom. Next, I found the image on the site, and we read over a couple of other students’ thoughts on the same picture. My students noticed that many of the comments were similar to other students around the nation, but that the comments that stood out the most to them were the comments that pointed out things my class hadn’t brought up during our discussion. Finally, I revealed the original caption and information that went along with the picture, and we discussed how different our thinking was from the real story.

Here is how to get the most out of this free, authentic resource: 
  1. Create a free account and subscribe, so you don't miss a picture.
  2. Read the introductory post and how other teachers are using this resource in their classroom.
  3. Look over the archived images and some of the prior discussion threads to see how you can use the different images in your classroom. Maybe a specific picture can kick start a new article/novel your class will begin soon? Or a picture can introduce concept discussed in social studies or science?
  4. Pick your favorite image and introduce it to your class!

Let me know how you use this resource in with your students, 
Jenni Merry

Thursday, October 24, 2019

Halloween Doesn’t have to be a Scary Teaching Day

I love all holidays, but there is something about Halloween that I adore. I have so many fun memories surrounding Halloween. Many as a child in my homemade costumes that would fall apart as the night was finishing up, and other memories as an adult getting my children ready for a fun night in our community. I love the excitement and innocence the day brings out in people, and let’s be honest, the abundance of candy everywhere.

“I’m so glad Halloween falls on a Thursday this year… said no teacher ever.”- Unknown

One thing that I didn’t enjoy about Halloween was teaching on the day and the day that follows. In the past, I felt like the kids weren’t mentally prepared to learn either of those days. I could tell that they were passive learners during instruction, which frustrated me. After speaking to coworkers, I quickly found out what my problem was. I was treating Halloween as just any other day. We just continued with our regularly scheduled program. I wasn’t allowing my students to be excited about Halloween the same way I was as a child or the same way my children were.
So a couple of years ago, I reluctantly made some changes in my approach to Halloween in the classroom, which, to my surprise, transformed my outlook on teaching on Halloween. Here are a couple of ideas I’ve implemented around Halloween to help engage my students on and around Halloween:
  1. Creative writing meets speaking task- Have students practice their use of sensory details while writing a sales pitch for a haunted house. The students first sketch the layout of the haunted house and write at least one spooky detail about each room. Next, they create a setting for the home and start writing their pitch. Lastly, I have students practice reading their pitch (10-15 times) and record it on Flipgrid (here is a link to a previous post on how to use Flipgrid in the classroom). I have them record their pitches on Flipgrid a couple of days before Halloween, so we can listen and vote on Halloween day. This way, students are actively listening to their at least five peers, taking notes on the sensory details they used, and an overall grade using a presentation rubric. And guess what the room is silent. Silent on Halloween is unheard of, right?
  2. Putting dead words to rest- This activity seems to be perfectly timed because, at this point in the year, we’ve discussed word choice and descriptive language. Students are used to me, prompting them to revise their writing and rethink their word choice. For this activity, I print a list of commonly used words that I want my students to stay away from for the remainder of the year. For example: like, said, really, fun, good, etc. Students pick a word from the list and create a tombstone for the word. I have students look up 3-4 synonyms for the dead word and write a eulogy for the word. When students finish, we display them in our graveyard (bulletin board), where students can refer back to them all year. *This is not something I created. I found this idea on social media a couple of years back and loved it.
  3. Collaborative spooky stories- Practice narrative brief writes with spooky story starters, middle, and ends taped to the students’ desks. Here is an example: "My friends and I went on a hayride to enjoy the autumn leaves. We knew something was wrong when we all got a chill trickle down our spine…" Students are told that they have 2 minutes to read and think and then 3 minutes to write. Each student rotates around their table group until they get back to their seats. They need to stay in the correct point of view use details from the students before them to continue the story in a collaborative tone. When everyone is back in their seats, they each take turns reading the story as a whole. I have each group choose one and discuss possible revisions as a group. Then they add or omit details as a group and present it to the room.
  4. Character autopsies- This can be a low prep or high prep activity depending on how involved you want to make it. Students will pick a character from a novel or story you read as a class and dissect the character. Ask them what the character thinks about (brain), the character’s perspective of the world (eyes), what the character holds in his/her hands (hands), etc. Have them decorate an outline of a body with their answers and textual evidence. You can use chart paper and cut out larger outlines for a small group to work on or keep it as an individual task. I plan on playing eerie music in the background and dimming the lights to set the stage. *This is not something I created. I found this idea on social media a couple of years back and loved it. 
What I like about these activities is that they are sensitive to students who do not celebrate Halloween at home, and they are all using many ELA standards. 
I hope you all have a spooky Halloween week with your students!
Jenni Merry 

Thursday, September 26, 2019

Step Inside: Reading Like a Reader


Student's annotations 
I find the skill of annotating a difficult skill to teach. Maybe it’s because I don’t remember ever being taught to annotate as a student, or perhaps it’s because there are so many different approaches to teaching annotating. If you do a web search on “Annotating a text,” you’ll get hundreds of results with different checklists and coding systems. However, there is one common thought across the board: readers annotate to show their thinking and to dig deeper into the text.  

As stated in my previous blog post (linked here), I took a couple of weeks to teach how to annotate explicitly and the purpose behind the practice. We practiced thinking aloud before we made our marks on the page. I found that this helped them to see that they were having thoughts while reading. After doing this with a couple of readings, I introduced our annotation marks two at a time. Per Peha’s research, I introduced: predicting, questioning, inferring, feeling, connecting, and evaluating. My students had a straightforward understanding of how to predict, question, feel, and connect to their reading. But when it comes to inferring and evaluating they have a difficult time noticing this in their thinking.

Below are Peha’s definitions of inferring and evaluating: 

Infer. Readers figure out things about what they read that aren’t actually written in the text. There’s almost always more to a story than just the words on the page. Often, writers leave “clues” that good readers can use to discover important information.

Evaluate. Readers make judgments while they read. Is this good? If so, what’s good about it? Do I like it? Why? Should I keep reading or should I put this down and get something else? Readers are finicky, impatient, judgmental. The evaluations they make help them decide whether or not what they are reading is valuable and, if so, how they might use it.

After reading with my students and questioning them to check for understanding, I could tell that they are capable of making inferences and evaluating the text. The challenge was getting them to notice when they were doing this thinking while reading. 

At this time, I turned to my FAVORITE professional development book- “Making Thinking Visible.” There are over 25 routines in this book, and every time I introduce a new one, it becomes my new favorite. My new favorite is the routine: Step Inside. This routine is perfect for getting my students to read like a reader, infer, and evaluate. As explained on the Visible Thinking website, “This routine helps students to explore different perspectives and viewpoints as they try to imagine things, events, problems, or issues differently. In some cases, this can lead to a more creative understanding of what is being studied.” During this routine, students are asked to step inside another mindset and answer four guiding questions.

Here is how I introduced “Step Inside” to my students:
  1. For the first time exploring this routine, I decided to use the class novel that we had just finished, “A Long Walk to Water.” As suggested in the “Making Thinking Visible,” I use the questions to “Step Inside” in a whole group setting to explore the main character’s (Salva) life. We used the novel so we could refer back to the text and use textual evidence to support our inferences and evaluations. 
  2. Next, I had my students work in their homogeneous groups and gave them a secret character from the novel. Differentiation trick- I strategically gave my highest group a character that had little evidence to refer back to, so they had to collaborate and discuss more than the other groups to complete this thinking. Similarity, I have my ELs grouped together and gave them another main character, so they had a bunch of text evidence to support their thinking. *Note- I have students groups in 4 different ways. I change the groups students work with depending on the task. 
  3. Students worked for 15-20 minutes to answer the four questions together. They had to use text evidence, infer, evaluate, and defend their thinking. And the best part was they did all of this with a level 1 voice because they didn’t want the other groups to hear their secret character (haha). 
  4. When they completed the guiding questions, they created a modified “I Am Poem” as the character. Their goal was to give clear enough clues so that the rest of the class could guess who their character was. 
  5. One spokesperson from each group shared their “I Am Poem,” and the rest of the class guessed who their character. During this time, students were using their knowledge of the text, inferring, and evaluating answers and information. Of course, I made sure to point that out and ruin the fun.

The thing I love about this routine the most is that it can be modified for so many different activities and contents. For example, I’m using it next week in social studies when we study the development of complex cultures with early humans. I’ll be using a picture from the My World textbook, and instead of giving the students a secret character, they will all look through the lens of an archaeologist. Depth and complexity while reading like a reader! 


Follow along to see how our reading and writing transforms, 
Jenni Merry

Wednesday, September 4, 2019

Forever in the Middle: Building Classroom Community


Building a Classroom Community


Welcome back to school, teachers!  One of the things I work hard to build and maintain in my classroom is a safe community environment where students feel welcome.  Creating a classroom that feels like a community only takes a few quick and easy steps.

Step 1:  Create a welcoming environment
Teachers are pros at decorating but setting up a welcoming environment really means nothing more than creating an organized and clean space with a few decorative details.  It's not necessary to go over the top with decorating.  If you walk into your own classroom and are able to feel more relaxed or happy, then you've accomplished this first step.

Step 2: Show your students you enjoy their company
I know the old mantra is "don't smile until Christmas," but I never was any good at following that. Having fun with the kids and being cheerful has always worked out better for me.  One new approach I tried out this year and am really enjoying is my Roll Call Question.  Each day, students have a question they are asked such as, "what is your favorite color?" or  "would you rather live without music or TV?" The possibilities are really endless with these.  Then I use my equity cards to call each student and instead of responding with "here," they answer the question. It takes less than 90 seconds each period and students get to know each other a little more as a bonus.

Now, three weeks into the school year, they look forward to the question and I've even had kids suggest the next day's question.  I've been extremely impressed with what effect this has had on the classroom community and it's always fun to see what they say to some of our crazy questions like, "is cereal soup?"

Step 3: Teach classroom structures
We all know that kids crave structure and usually do better in environments where they know what to expect.  This is why teaching classroom structures is a great way to build community.  Some structures to teach are: entering and exiting the classroom, passing out or handing in assignments, moving around the classroom, restroom and drinking fountain procedures, and student versus teacher areas.  Once these have been mastered, give your students jobs within the class to help things run smoothly. Sharing the responsibilities gives them a purpose within the group.

Other ways I build community:

This year I am exploring using flexible seating and I have seen great success with my students. The freedom to "choose where you learn best" allows my students to really take charge of their own success and learn how to make good choices in where they sit and who they sit with. Also, they get to feel more grownup as they see that I trust them to make these choices.

Another feature of my classroom is our class pet, Claire.  She is a two month old bearded dragon and the students love having her in the room. As she gets older and larger, she will be able to be out more as I teach but for now she is in her cage most of the time. Since she is growing and will be nearly full grown by the end of the school year, we even do a weekly measurement of her length to see how much she has grown.  She also has an Instagram account (@foxywaterclaire) because every class pet needs an Instagram, right?

Whatever approach you take to build your classroom community, the most important thing is to make sure that however you do it, make it genuine.  Kids are extremely perceptive and appreciate honesty as well as respect.
Until next time, keep the magic alive.

Kandyce Valverde

Let me know how you build relationships and community in your classroom in the comments below!

Follow what my class is up to on my teacher Twitter @valverderules

Most Viewed Posts