Thursday, October 28, 2021

What's So Great About Thinking Maps?

My name is Eric, and I’m a nerd. My nerdiness is vast, but I would like to believe its most useful manifestation is in the area of pedagogy. When it comes to teaching, the question that is constantly in the back of my mind is some version of, “Is there a better way to do this?” And the answer, invariably, is something like, “Yes, yes there is. There is an infinitely better way to do this, but it is going to devour most of your mental and physical energy for the foreseeable future.” To which I frequently reply, “Sounds great!” 

Over the course of the past decade, I have become convinced that Thinking Maps, in all of their various forms, are the most effective way to improve my instruction across all areas of the curriculum. Here, in my first post, I lay out several reasons the use of Thinking Maps should be considered foundational to your planning and teaching.

Metacognitive Purpose

According to the book Better Learning Through Structured Teaching, there are three domains in which teachers can establish a purpose for a lesson: content (subject matter), language (key terms), and social (SEL skills). To these, I would add a fourth domain: metacognitive. I strongly believe that if we want to develop our students into intellectually autonomous thinkers and learners, we need to teach them to reflect on their thinking and learning. Without a solid familiarity with the structures of cognition, students are unlikely to notice or comprehend what their brains are doing. 


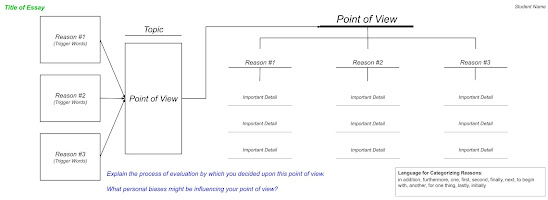
Thinking maps allow teachers to seamlessly build these structures of cognition into lessons on a consistent basis by providing logical, easily recognizable frameworks for thinking. The content purpose of a lesson might be to teach students to provide reasons for their points of view, but a Left-Sided Partial Multi-Flow Map helps them to see the causal relationship between reasons and opinions, satisfying a metacognitive goal as well. An accompanying Tree Map makes clear that reasons need to be clarified and/or elaborated. A bank of words embedded in the map reminds students there is a set of terms associated with this type of thinking, and a well placed Blue Frame of Reference question (more on this in my next post), at the bottom of the map, can remind students to consider their biases when formulating an opinion and/or make a connection between opinion writing and the “Evaluate” level of Bloom’s Taxonomy.


Making Thinking Visible

I have determined that there are two main categories of Thinking Maps. The first is the student-generated map with which you are most likely familiar. This is the sort of map you ask students to create in order to plan a piece of writing or show their understanding of a particular lesson. The beauty of this sort of map is that it can show the teacher exactly what a student was thinking and how well they understood the task. A quick glance at a student-generated map usually allows a teacher to discern whether a student is on the right track. Did they put adjectives and adjective phrases in the bubbles on a Bubble Map or similarities in the central bubbles of a Double Bubble Map?


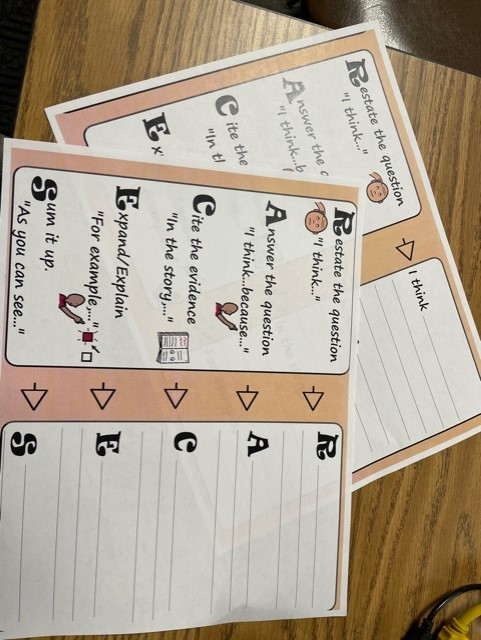
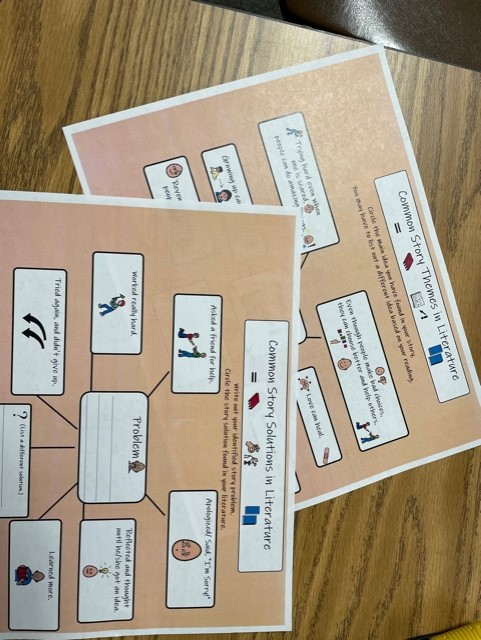
The second category of map is what I refer to as a “response map.” This kind of map permits me to show students what I am thinking. An example of this is a “Backstory Tree Map” I created for Literature Circles. As it happens, there are five techniques with which an author can provide backstory in a narrative. I made a Tree Map with five “branches,” one for each technique, and wrote hints on how to identify each technique on the lines below (on a digital version that could be written over or printed as directions). It was then up to the students to identify instances of backstory in their Literature Circle books and classify them appropriately on their Tree Maps. This map achieved the content purpose of helping students learn the five backstory techniques, but it also drove home the metacognitive point that the techniques should be considered distinct categories. 


Flexibility
Another of the many reasons I believe Thinking Maps should be foundational to your planning and teaching is their infinite flexibility. By this I mean that they can be used with any lesson, in any subject, at any ability level, throughout the teaching day. If your ELA, social studies, or science textbook requires students to complete a random, poorly designed graphic organizer, you can easily convert said graphic organizer into a Thinking Map. This might seem like an unnecessary bit of extra effort on your part, but it will allow students to connect the assignment to familiar modes of thinking, bringing down their affective filters and allowing them to focus on the content purpose of the activity. It also gives you the opportunity to raise or lower the rigor of the assignment using the techniques discussed in the next and final section.

Rigor

The best argument for making Thinking Maps integral to your instruction is the control they give you over the rigor of a lesson/assignment. You can easily build as much or as little scaffolding into a map as you deem necessary. 


One way you can do this is by raising or lowering the level of strategic thinking through your map selection. For example, I use three different maps for making text-to-self connections. The first, a Circle Map with a Frame of Reference, allows a student to connect any character in a story to any person in their life. Each connection can be about a different character and/or person, so it is very open-ended. The second map, a Double Bubble Map with only similarity bubbles, forces the student to make much deeper and more numerous connections since they have to choose one character and compare her/him to just one person in their life. The most rigorous text-to-self connections map I have created is actually a series of Bridge Maps which requires the student to make analogical connections, indirect connections which need to be explained in detail. With these three maps at my disposal, the same reading strategy can be practiced with significantly different levels of rigor.


In addition to map selection, you can adjust the rigor of an assignment by embedding more or less scaffolding in the boxes or bubbles of the map (see the above example of the Backstory Map).


Questions from the Metacognitive Frames of Reference are another way to raise rigor, but, since they will be the subject of my next blog post, I will refrain from discussing them until then. For now, I strongly suggest experimenting with using Thinking Maps as often as possible. I think you will find your comfort level will quickly improve. Hopefully, you will have a lot of questions for me in the comment section below!


Writing Every Day,


Eric Lovein


PS: Check out my post about Summarizing Flow Maps!: https://spotlightclassrooms.blogspot.com/2022/03/thinking-maps-for-fictional-narrative.html


...and my video on Circle Maps!:

https://www.youtube.com/watch?v=vuQ9RkXXZcI


Tuesday, October 26, 2021

Digging Deeper Into Learning Strategies: Close Reading for Exceptional Learners

 By Heather Pfrunder, M.A.Ed.   SDC Teacher and Education Specialist

October 25, 2021


The written word...oh how I love thee!  I could wax poetic for at least 5 pages on how much I LOVE reading, and even writing!  However, teaching this all encompassing and vital subject had me shaking in my boots as a new teacher.  There is just sooo much to cover.  In fact, my first several years of teaching I merely tested the waters of what I might explore versus really developing deeper strategies.  Upon my third school year teaching, and my first at OMSD, I really began to grow in this area.  However, implementing strategies which include writing to learn seemed daunting to students that barely acquired phonics skills and were challenged to learn vocabulary.   So I went down checklists: What do my students need to learn?  What is required that they have exposure and learn to use strategies comparable to their typical peers -- particularly AVID?  How do I select texts?  So hang tight - because this post has every resource I’ve ever created (and 2 I gathered) for ELA -- all downloadable!


What do my students need to learn? 


  1. A-typical/autistic students require visuals (i.e. pictures) to help them relate the written word to a concept.  This strategy is also helpful for students with cognitive delays or are Language Learners (that covers 100% of my students and probably a few of your students, too).

  2. Repetitive practice to understand the task demand so that they can focus on the actual learning/application of learning.

  3. Simplicity - while a concept can be complex to a degree, the format needs to be not too visually busy.


What Strategies Do I Need to Teach?


From a fundamental standpoint I need to address the following skills, as all reading comprehension rests on the following (and note - I usually teach them in this order):

  1. Wh- Questions

  2. Story Sequence

  3. Story Retelling

  4. Citing Text Evidence

  5. Identifying Themes

  6. Metacognition While Reading


Added to that are specific expectations of how learning should occur: AVID (i.e. column notes/WICOR, RACES, Thinking Maps, Costa’s Levels of Thinking), and of course, our district appointed curriculum: Wonders.


Starting with Wh- Questions, try using a mat to reference Wh- Mat Free Resource

Then break it down: Using a graphic organizer


This one I created. It has the blue shading because most of my students

are also challenged with their handwriting skills.


Story Sequence: For this one I typically start with taking pictures of the story.  Students can reference the book to match the order.  Notice the difference between the two sets of visuals: the one I used earlier in the year also includes the text for students to cite.  As they become more proficient, they are expected to find the words in the actual text:


Notice the Select Your Theme at the bottom? After a passage/story
review, they are given options to identify the type of story and the
change or significance of the story.
                                                                  

Story Telling: I created several versions of this graphic organizer, each version addressing Costa’s Levels of Thinking.  Below is the simple level one thinking.

Yup… I love the “Someone, Wanted, But, So, Then, Finally” format of story retelling.  You pretty much can’t go wrong with simple stories.  For added challenge, students really have to pay attention to time frames in a story if it starts with a “flash-forward.”


Citing Text Evidence:  Joint-attention is challenging enough when you are looking at a book and then worksheet to complete your work.  Add a graphic organizer on the wall to this, and well… who’s lost?  Everyone! Sigh… Solution?  Imbed the expectations right into the worksheet.  Make the worksheet a template and apply, and reapply… over time the concept is learned! Not only are we citing text evidence, but we are also reflecting on the Essential Question that is posed within the Wonders Curriculum.


Note: there are two different versions of this RACE and RACES - 

Start with RACE for beginning learners.


Identifying Themes: This always has me near tears.  Abstract concepts are so hard for my students to connect with!  But then I realized that the solution could be as simple as basic story themes themselves!  Aren’t common themes recycled in most literature?  Especially simple literature?  I started with Thinking Maps about story problems/solutions, and then after this reflection, the Thinking Map for Story themes became a matter of visual connect-the-dots.


Story Problems and Story Themes are laid out into Thinking Maps. 

While Thinking Maps are meant to help students organize their own thoughts,

Modeling with them also has benefits.


Metacognition While Reading: While all of the previous graphic organizers can address metacognition with additional visuals and check in’s, there is one strategy that made an amazing difference for my more advanced learners, and that is the CSR Learning Model. Of note that the CSR model is not only a reflection of reading comprehension, but done correctly, it is also done in collaboration with a peer.  So think about Kagan strategies in conjunction with this.  CSR stands for: “The Collaborative Strategic Reading (CSR) strategy incorporates cooperative learning, vocabulary development, questioning techniques, opportunities to practice, and students’ use of prior knowledge” (Per: nysrti.org/intervention-tools/reading-tools/tool:csr/).

In its simplest of explanations, students reflect on what they “get” or the “GIST” of a passage/story and what they “don’t get” or the “CLUNK” of the passage/story.  Often, this boils down to vocabulary or word usage.  And for this I like to use the Frayer Model to do a deep dig dive on a per student vocabulary.  What I love about this is that vocabulary learning now becomes not based on teacher assigned work, but student identified need.  By the end of the process/last multiple read students really have looked deeply into what the passage says.  (Of note: while this works for all texts, I really like to begin with non-fiction texts of interest, especially those with more academic words.)


This is a simple graphic organizer with the before, during, and after reflections. 


For more on the CSR model you can explore: https://iris.peabody.vanderbilt.edu/module/csr/cresource/q1/p01/#content


Everything I have shared and More can be downloaded here:

Close Reading Strategies for Diverse Learners


So at this point I have shared a lot of resources and strategies.  Hopefully one or more will help you and your students on the very long road to English proficiency.  While all of these resources are created to exist in conjunction with the texts, often the question lies in which text to pick -- after all the provided resources of Mc-Graw Hill’s Wonders program can seem like an ocean when prep time demands that you select from a more pond-sized selection.


How Do I Select Texts?


For this I am suggesting that selection is either for UA/ELD support or if you are in an SDC setting like myself - you are adjusting based on IEP goals. So here goes the short version at the end of a long blog post!


  1. I actually like the Phonics Readers to begin teaching how to use strategies.  The simple text helps students focus on the main points.

  2. From there I go to the Anthology texts using the above shared graphic organizers.  I focus on main events and new vocabulary. I typically begin each story with a short video clip to introduce the topic and/or vocabulary slides.

  3. From there I go into using the Close Reading Companion (Grade 1-2) or Wonderworks (Grades 2- and beyond): story selections are vocabulary rich, with visuals, and tend to be slightly shorter than the Anthology.  I shift to this resource because the embedded questions on the page are much easier to navigate but are also complex enough to challenge and expand their understanding beyond the initial graphic organizers I have shared. Additionally, students can underline not only the work cited, but the key words in the questions being asked.


Over the years I have used supplemental resources (as found on teacherspayteachers.com) or programs like “Read Naturally,” but the idea is that students have access to high quality texts and are commensurate to their typically developing peers.  In this, adapting strategies to work in conjunction with the Wonders curriculum not only meets the unique needs of the students, but allows them access to the general education curriculum.


Like what you read?  Join me in upcoming blog posts where I continue to put these strategies into place and share resources!


Friday, October 15, 2021

Top 5 Reasons To Use A Visual Schedule


When I tell people I devote an entire white board to my daily schedule, they look at me like I’ve lost it. Why devote such valuable real estate to something so simple? Read on for * reasons why I strongly advocate for the use of a visual schedule in the classroom.


1. Predictability

Students know what is expected of them when. As children, they have very little control over their lives and with anxiety on the rise, adding this bit of predictability to their day helps students feel less stressed and more prepared to face the day. 


2. No more “What time is _____?” and “Are we doing _____ today?” etc.

I feature a digital clock next to my analog clock to help students identify exactly when we will be doing what. In the first couple of weeks, students will still ask and I will direct them to the schedule.


3. Learning targets and page numbers

Again, students know what to do. They can easily look at the clock, look at the schedule, and determine what subject and page number we are on. It also helps me by ensuring I highlight the learning target which has embedded IB Language.


4. Models time management and builds table reading skills

Students can see I pace my lessons according to how much time we have for each task. I tell students to “move with urgency” as we transition from task to task and they can see what they are expected to move on to next. Essentially, it’s a visual representation that even though we DO have all day, we DON’T have all day for Math or Writing and they need to focus on the task at hand.


5. Functions as an Emergency Sub Plan

I’ve had many unpredicted absences and writing out my schedule before I leave for the day ensures that no matter what, the day will run smoothly.


And there you have my top 5 reasons to utilize such valuable classroom real estate to a schedule because, really, it’s SO much more than a schedule.


As I close, I invite you to join me in these affirmations.


I am safe.

I am loved.

I am powerful.


Here for you,

Ruth Reinkymov

3rd Grade Teacher

Hawthorne IB World School


Monday, October 4, 2021

Station Rotation Model - Middle School Math


Have you wondered, "How can I teach a smaller group of students versus the whole class?"

Have you wondered, "How can I get really focused on individual student needs when I have a class of 32 students?"

Do you wish that you could 'fill the gaps' with those students needing it and then also differentiate for those students who are needing to be pushed further in their learning - in the same class period?

Do you wish that you could blend technology with in person teaching?

I believe that we all have wonders - because everyone (students and teachers alike) ask questions when they are ready to ask - and this is because we are all at different places in our journey of learning.


Our site's focus this year is Universe Design for Learning (UDL).  While we are just in the infancy stages of learning, I found some interesting material in the book "UDL and Blended Learning" by Katie Novak and Catlin Tucker - by the way, I have never been so challenged in examining my own teaching practices as I read this book (well worth the time and I recommend it).


There was an interesting part in the book on the Station Rotation Model that I brought up with the Math 8 Team that I am part of - and they embraced the challenge of implementing at least one Station Rotation Model during each Eureka module of study this year.  I am very lucky and privileged to be part of such a group of teachers (Sandra Castillo, Ylonda Keeton and Jennifer Nelson) who are willing to step out of their comfort zone to try a new teaching strategy that has the opportunity to engage students and impact student achievement.


In the Station Rotation Model we embraced, our design initially had four components to it but we quickly learned that in a 50 minute period this was not the best format for our students.  So, we have landed on a three component rotation model where one station is an online activity, another is a collaborative activity, and the last one is the teacher led station.  We have found that this design allows students enough time to engage in each activity and have success during that time.


The Station Rotation Model allows for teachers to interact with students in a smaller group setting versus the entire class.  Groups can be set up randomly or deliberately based on data - there is no right or wrong way to set up your groups.  This is an opportunity to extend students' thinking in areas they are excelling at or to fill some learning gaps so that the grade level material can be fully accessed by each student.  

In the Station Rotation Model that we just completed, our teacher led activity was for students to pair up and solve a multi-step equation by putting the steps in order and match up the vocabulary that went with each step.  This was a great opportunity to engage with students in a smaller setting to solidify how to solve equations.  

The second station allowed students to solve equations, as well, but using a computer program - Desmos.  The activity that was designed allowed students to solve equations - the activity gave students immediate feedback as to the correctness of their answers.  This allowed students to self pace through the activity without doing everything wrong and ask their table partner for assistance when needed.


The third station was designed to work on their project - #MathInMyLife - which is a real world application of solving equations.  During this station, students could collaborate on their challenging project question - which was different for every student.


The Math 8 Team has only done the Station Rotation Model three times this year and the feedback from
the students is just amazing - they appreciate the smaller group setting, they enjoy working with others, they enjoy that things are changing every 15 minutes.  We have a reflection form that allows students to reflect on each station and give feedback for the entire day - this last reflection had over 95% of the students state that they enjoyed the day for various reasons.


There is planning that is required for this type of student engagement activity and you really need to design it so that it fits your teaching style and classroom.  For example, across our Math 8 Team we implement the model slightly differently as one of us actually has students get up and move from station to station - compared to the way I implement it as students stay in their seats and the station activity moves from group to group.  Again, just like with grouping, there is no right or wrong way to implement your design.


If this sounds like an engagement strategy that you would like to see in action, then please reach out to Ms. Roni Weink at Roni.Weink@omsd.net.  The District actually videotaped this lesson and it is available for viewing.  If you have questions, then please feel free to reach out to me and I will answer them as best as I can.


I hope that you are finding various ways to engage students in your classroom and perhaps this idea will spark something new for you.


Teaching and still loving it,

 Kevin Stott                             
De Anza Middle School        
Math 8 & Integrated Math I

Most Viewed Posts