Friday, August 27, 2021

Setting the Tone with Read Alouds

The first few weeks of school are a great time to set the tone for the rest of the year. I find this is an excellent time to work with students to establish our classroom culture through reading aloud books that focus on my vision for the class. I have taught 1st-5th grade and have always started the year this way with great success. Now you might be thinking, “Um, Ruth, we’ve already been in school for over a month,” and yes, that’s true. But it’s never too late for a good book, especially if the stress of the start of the new school year left classroom culture building a bit neglected.

Here’s a non-exhaustive list of the books I read in the first week of class and how I use them to establish our classroom culture. I read them in sittings as they are grouped so students can make connections between the books and identify the overall theme of that particular set of books. Again, you might be thinking, “Ruth, there are nineteen books on this list. Surely you don’t read them ALL in the first week?” but indeed I do, dear reader! I find it to be a nice way to ease into the school year by having so many read alouds and it also establishes literacy as something central to our classroom.

If reading this whole list overwhelms you, I encourage you to skim the headings and just read the section you feel would be best for your current classroom situation. 


General Welcome

Our Class Is A Family by Shannon Olsen

All Are Welcome by Suzanne Kaufman

When students enter the classroom, I greet them at the door, give them a name tag, and have them head straight to the carpet. Once they are settled I introduce myself and read them these books. I tell them that we are a diverse group of learners and that I am thrilled to be working with them this year. I ask them to share ways they can make all feel welcome and how we will act like a family this year. We discuss what it means to be a classroom family and what that means about how we treat one another.


Belonging

Exclamation Mark by Amy Krouse Rosenthal and Tom Lichtenheld

It’s OK To Be Different by Sharon Purtill

I Like Myself by Karen Beaumont

I want every student to have the confidence to be themselves. I capitalize on every opportunity to highlight diversity in the classroom while ensuring there is a consistent undertone of belonging and acceptance. I ask students to reflect on a time they didn’t feel they belonged and how that impacted their emotions and experience. I then ask them to think about when they did feel they belonged and what that experience was like. We brainstorm ideas on a circle map for how to make everyone in the class and the school feel like they belong here. I follow this up with an All About Me pennant that is displayed in the classroom all year. I take a photo of each student on the first day, print them out in color, and glue them to the pennant before I display them. It’s great décor and students and families love to look at these. There are many free versions of pennants on TpT.

Restorative Practices

I Love You Because You’re You by Liza Baker

This one might raise a few eyebrows because it’s written from the perspective of a mother to her child. However, I want to establish right away that I am a caring adult to these children and that I will truly love and care for them regardless of their actions. This sets the tone for restorative practices in the classroom. When I establish from the very beginning that I want what’s best for students, they know that my reactions and expectations are all rooted in that love.


Class Norms

Lacy Walker, Nonstop Talker by Christina Jones

My Mouth Is A Volcano by Julia Cook

Interrupting Chicken by David Ezra Stein

Now here’s where the rubber really meets the road. Before I read these books I cheekily ask students to think of why I might be reading these to them. I’ll pause periodically and look at them with a meaningful glance to emphasize certain points. This never fails to make them giggle and acknowledge that yes, they’ve been guilty of monopolizing the conversation or “erupting” before. After these read alouds. I ask them to consider all the books we have read so far and what they want our class to look like, sound like, and feel like. I frame these through the lens of our PBIS key words. From this brainstorm, we create a class compact that everyone signs and that is posted at the front of the classroom. If a student violates a norm, I point to the poster, restate the norm, and redirect them to expected behavior. This is so much more powerful than what I used to do which was essentially tell kids not to interrupt. By referring to the norms they created, I am being consistent and also building their capacity for productive classroom interactions.


Responsibility

Fill A Bucket by Carol McCloud and Katherine Martin

What If Everybody Did That? By Ellen Javernick

Say Something! By Peter Hamilton Reynolds

Every morning, my students and I repeat affirmations with one another. One of them is “I am powerful” and “I can change the world.” I use these books to establish the power of one. I want students to know that they matter, their voice is important, and that they have the power to change. I use the title phrases throughout the year saying, “You filled my bucket!” when students do an act of service, “What if everybody did that?” when students make a poor choice, and “Thank you for being brave and saying something” when a student advocates for themselves or others. 


Addressing Anxieties

A Little Spot Of Anxiety by Diane Alber

Wilma Jean The Worry Machine by Julia Cook

Captain Snout And The Super Power Questions by Daniel G. Amen

This year is so full of uncertainties and our students feel the stress and anxiety of the world around them. Reading these books gives students specific skills to use in order to calm down and manage their worries. I remind students of these strategies before we take a test or when I announce I will be out and they will have a sub. These books reinforce all the vital work we are doing in our S.E.L. lessons every morning. 


Growth Mindset

The OK Book Amy Krouse Rosenthal and Tom Lichtenheld

The Girl Who Never Made Mistakes by Mark Pett and Gary Rubinstein

Yes, I Can! By Nadya Mikulinsky

I Can Do Hard Things by Gabi Garcia

I’ve noticed that this year I have a group that is very failure averse. They are afraid to try because they might not be perfect. I noticed students relaxing after I read these books and being much more willing to attempt things. They also set up the phrase I use all year “You don’t have to be perfect, you just have to try” which is echoed in one of our daily affirmations of “I can do hard things.”


Wrap Up

And there you have it! The books I read to set the tone of my classroom and establish a culture of acceptance and perseverance. If you’re interested in doing this, I encourage you to start small. Pick a few of the books and introduce them to your class. As the years go on, you’ll build up a more and more robust reading list and you can then pick which you feel are best for your group of kids that year. Feel free to reach out with any questions and I would LOVE to hear if you’ve tried these books!


As I close, I invite you to join me in these affirmations.


I am doing the best I can.

I belong here.

I deserve rest.


It’s going to be a different year than ever before and YOU are exactly where you belong, changing the world one kid at a time.


Here for you,

Ruth Reinkymov

3rd Grade Teacher

Hawthorne IB World School


Tuesday, August 24, 2021

Growth Mindset: Successful Students with Jot Thoughts


During the first few weeks back to school, it's so important to build a sense of community and belonging amongst your students.  You want them to feel that your classrom is a safe place to learn and share.  Through all the team building and classroom building activities that I engage my students in the first few weeks, I think it's equally important to place an emphasis on Growth Mindset.  We know that your mindset can change or determine your outcome and success, and that's so very true for our students as well!

Being as though we are an AVID school for many years now, one of the first activities we do at the start of the year is something called the "Successful Student." For this activity, students will brainstorm words that show what it means to be a successful student.  I copy the outline of a person onto cardstock and here they decorate the person to look like themselves and fill the poster with words that describe being a successful student.


I incorporated Growth Mindset into this activity by asing them to think of things they feel they're not good at "yet" or things they want to become better at as a studnet this year.


I used a collaboratve learning Kagan strategy called "Jot Thoughts" to help guide and facilitate discussions about growth mindset and what it means to be a successful student.  You can see the pictures I've included of this Jot Thoughts strategy as my students engaging in these discussions the first week of school!  You can also see the photos of the finished product of the "Successful Students."

This "Successful Student" activity is just one example of a very simple way to use collaborate learning (Kagan- Jot Thoughts), and Growth Mindset to help students engage in positive thinking. It's also a super fun activity, helps them to learn how to work together, and not to mention they look super cute up on the wall!

Collaboratively Learning,

Copy of pic- Megan Brown.jpg

Tuesday, August 3, 2021

Building Relationships with Our Students - Deliberate & Intentional


Welcome back to another school year like no other - yes, it will be unique in its challenges and successes.  Each of us has our own individual stories about teaching during the pandemic of 2020/21.  Hold those stories dear to you because they are important and use them to shape your teaching for this school year. 

My hope this year is to share my journey in a post pandemic school year that is shaped by how I taught prior to the pandemic, what I learned during the pandemic, and what I hope to become after the pandemic.  I hope to share how I continue to grow as a teacher in trying to make connections with my students so that they become life long learners.

To start the year off, I encourage you to get to know your students.  Find out their interests, their likes and dislikes, their favorite classes, their favorite artists, what they like to do in their free time, what they do on the weekend and on and on and on.  Getting to know your students will then allow you to tap into these interests and weave them into your subject matter - with the idea of building motivation for your students.

Here are a few ideas I use to try and build a connection with my students in the first week of school:

1.  Prior to the school year, I write each student a postcard.  The hope that I have is that students realize I am thinking about them and that I am excited about the upcoming school year.  I start writing them midsummer because writing 150 postcards takes some time.  The one additional benefit that surprised me was the parents' reactions and how they appreciated the effort to connect with their child prior to school starting.  The postcards are addressed to the parents and students - below is an example from this year.


2.  On the first day of school, I have students do an activity where they write ONE word that describes their hopes, dreams, and goals for the year.  The word should have special meaning to the student so that when you think of this word you can at least make an attempt to live by that word each day.  I give each student a blank sheet of paper where they write the word down and add color/images to the sheet of paper.  The idea for this activity came from "Write on with Miss G" during one of my many Google searches a couple years back.  This year I plan on expanding the activity by taking each student's word and displaying one word each day from each of my classes in the back of the room.  The idea being that for that day this is my 'special' student who has given the class a word to live by in the hopes that each student will feel special on their day that their word is displayed.  See below for ideas:


3.  I also do 'Name Tents with Feedback'.  The idea comes from Ms. VanDerWerf  - check out her blog post.  This does take some time during the first week of school but I have found that the time spent going through each student's response allows me to get to know each student and provide them with a personal statement back.  The purpose of this activity each day is to start the process of building a relationship with each student - a relationship that hopefully will provide the opportunities to build motivation and lifelong learners with each individual student.  I have modified the name tents so that they have these questions:  Click here


As you begin this new school year, I hope that you connect with your students in unique ways so that relationships can be forged that will allow each and every student to achieve more than they ever thought possible.  Building relationships begins the process of creating a safe environment for our students - and after last year, many students are looking for this safe place in their lives.

My upcoming blogs will focus on student motivation, Universal Design for Learning, student feedback and much, much more - I hope that you come back next month to find out what is happening in my classroom.  You can also reach out to me to come and visit my classroom anytime.

Remember, take care of yourself as well during this challenging upcoming year, and most importantly, give yourself grace.


Teaching and still loving it,     

Kevin Stott                              
De Anza Middle School          
8th grade & Integrated Math I


Wednesday, March 31, 2021

Making Math Discourse Stick- a Stick It Together Solution

Number talks, thinking mats, constructed responses... I love it all! It's ironic because as a kid I distinctly recall telling people that I wasn't a "math person". The funny thing was that I didn't get bad grades in math- I only recall saying that when I was struggling with a concept and it was then that I realized that is how many of our students feel. Regardless if it was a complete process error made on my part or a simple computational error that resulted in the incorrect answer - if it isn't correct they internalize that they don't know it at all! What I realized in the classroom that this activity addresses the issue by allowing students to talk through their thinking without having to feel like they don't know because they work together to discuss their rationale on their approach and appreciate those errors made since it was necessary to understanding the correct answer. So this sounds great and all, but how do we execute this during distance learning? Well with G Suite, of course and breakout rooms. 

The Process Before the Process 
When assigning a Stick It Together there are a few steps that need to take place to ensure that it runs smoothly and is impactful for all students.

+ Groupings- As you would in the classroom- the stick it together mat is designed to have students with varying academic abilities work together to solve a problem. The mat has four different color sticky notes which each represent a different academic level as represented with the Kagan technique: High, High Medium, Low Medium, and Low.
 
+Problem-   Application problems, exit tickets, and word problems from the Eureka curriculum lend itself well to use for the stick it together prompt. You may even choose a simple problem to determine if students are able to understand the problem at a computational level.  

+Creation-  When creating the assignment I use both Google Slides and Google Drawings. Google Drawings is where students will create their work that they will then copy onto their own virtual sticky note. When assigning this you will want to set it as "Make a copy for each student". For the Google Slides you will copy the same slide for how many groups of 4- making it "students can edit". This allows you to see all groups at the same time as well as allowing members from the same group work to create the final Best Answer. When the activity is done I change the share settings to "students can view file" so no changes can be done while I am reviewing and providing feedback. For template copies of both click HERE & HERE
The Implementation:
Having students actually working to complete the Stick It Together is the best part because it is a time where as a teacher become the facilitator and allow students to take the reins of their learning. Keep in mind that the first few times you do this activity it will take time - but with practice it will run smoother and students will ask for more time just to talk about what they could have done to make it the best possible answer- because improvement is the goal. Here are the steps that I follow to complete the stick it together. If you would like a Copy of the digital presentation click HERE

  1. x-Present the Problem= Have students open up their digital google slides assignment so they can see the problem for themselves. During this time I read the problem aloud to students and ask them to analyze what pieces of the problem they will need to be successful. Students will generally point out any vocabulary such as "product" or if there is a picture they will use math vocabulary to describe the picture (i.e "angles") 
  2.  x-Think Time =This step is crucial because it allows students to think about the process they will take in attempting the problem. During this time students may run through multiple strategies they could use to solve this problem before deciding which is the best one. When this time is provided it allows students to feel confident when it is time for them to start working on the problem. Keep in mind that NO WORK is being done during this time - it is purely time for students to Think about the problem. Your low medium and low students will thank you for this because when it is time for them to start working they won't feel rushed and it allows students to work out any misconceptions they may make without this step. 
  3. x-Completing the Problem= Have students open up their Google Drawing assignment----> click on the "line" icon------> select "scribble". This tool allows students to write and draw their numbers that best resembles writing in pen. Students may also use the "Shapes" and "Text Box" tool to fill out their sticky note. To ensure that all students are making adequate progress I monitor on Lanschool and remind them of their time and give them gentle reminders to have RDW on their sticky note or as I say: Numbers, Pictures & Words. If this is a step that is difficult for your grade level have students simply use the line/scribble tool on google slides in order to avoid step 4. I personally decided to use Google Drawings so students work is their own and they are unable to copy or all do the same strategy because they see their partners work as it is being done on the google slide. 
  4. x- Copy & Paste= Now this is a step that doesn't have to be done if you were in the classroom, but what now what I do is have students select all of their work --------> Arrange------> Group. Then I will call out my colors and as their color is called they will paste their work and drag it to their corresponding sticky note. Making sure they group their work ensures that it all stays together and doesn't split when they move it. 
  5. x- Share Your Evidence (Breakout Rooms) = Once all students have pasted their google drawing of the completed problem it is time for the breakout rooms. I tell students which color I would like to go first. You can decide for this to be your High students to set as an example because they are more inclined to use academic vocabulary and clearly explain their work or you can have your Low students go first so they have that confidence without worrying about if their answer matches their group members. I personally have students select their breakout rooms based on their number slide in the google Slides- this helps with time. I work with students on explaining their sticky note by saying "First I did.....", "Then I did.....". When students go into their breakout rooms I have the student who is explaining their work share their screen and use the "pointer" feature on the slide so students can clearly see what part of their sticky note they are referring to. In the slide I also have a 2 minute timer that the presenter may share- this is to ensure that students are using the full time to ask any questions or make comments. As I am starting off I will bring students back and do a visual check that the selected person has shared. I will then say who is sharing next and send them back into the breakout room. This continues until all students in the group have shared. When I join the breakout rooms these are the main things I am looking for. 
  6. x- Determining a Best Answer=  This is the best part of this activity because this is where the collaboration comes in. My understanding of the "the best answer" is that students work together to take portions of their groups sticky note to create one entire sticky note of the question. For example if each student used a different strategy they may go with the one that best visually represents the problem while they might use a number sentence from another person's sticky note. During the discussion students may also realize that they didn't get the correct answer or their drawing isn't correct and so this is the time to correct any errors they did have. 

Extending The Activity

This type of activity takes time so I always like to make it meaningful even after students have completed it. Here are some ways that I like to extend the activity:

% Having Students Share an Ah Ha Moment= Right after students complete their best answer I will quickly do a 1 minute breakout room with a random peer and have them share something that they learned during that stick it together. This could be: a new strategy learned, the meaning of a vocabulary word, maybe an error that they made or that another student made, or anything that they helped make this activity valuable. While this isn't very difficult in task- it does help with building a class community and working with others. It also makes them aware to really reflect on what they just did and their contribution during the activity. 

% Analyzing and Grading Best Answers= After students complete some type of assignment they always wonder "How did they do"?. Now as teachers we know that we can't always provide automatic feedback so this is not only a great way for students to challenge themselves, but also understand rubrics to provide feedback. Next what I have them do is have students look at their own best answer and rate themselves a 1, 2, 3, or 4. This grading scale rubric is similar to the Eureka understanding. When students complete this process, you start to see that they are harder then you may be which is good because they are now internalizing the expectations and how to meet it. 

% Cross Curriculum Match Up= What I love about this activity is that it can be used with many different subject areas- such as using it for a RACE response or having students create an ending to a paragraph if you are working on having students understand text features & authors point of view. What is great that if you have a prompt for whichever subject this activity can be used. 


I know this is quite a bit to take in but to whichever amount you chose to implement it your students will enjoy the opportunity to collaborate with one another. 


                                                                    Lively Teaching,


Jessica Magana

Monday, March 29, 2021

Rhyme Time!


Teaching rhyming has always been a struggle for me. In my experience, most reading programs do not systematically teach rhyming.  It's a skill that is lightly touched upon with poems and stories.  It is also assumed that students had a lot of experience with rhyming, whether in preschool or at home.

In the past, it was second nature for parents to sing rhymes, chants, and songs to their young children, even before their children spoke one word.  I have fond memories reading a special nursery rhyme book with my grandmother while sitting in her lap.  Many of my students come to me not knowing a single nursery rhyme.  There is a strong link between the nursery rhyme knowledge of Pre-K children and their future success in reading and spelling (MacLean, Bryant, and Bradley, 1987).

Rhymes teach children auditory discrimination, listening skills, a rich range of language, concentration skills, oral storytelling, to listen for and keep a steady beat, to learn whole songs and chants by heart at a very young age, and to retell stories/chants without using a book.

There are 5 Stages of Rhyming:

1. Rhyme Exposure: Mop and hop rhyme because they both end with /op/.

2. Rhyme Recognition: cat, sat. Do these words rhyme?

3. Rhyme Judgement: goat, boat, man. Which word does not rhyme?

4. Rhyme Completion: She wants to run and /pl/ /ay/, on this bright and sunny _____.

5. Rhyme Production: What is a word that rhymes with ball?

On my quest to learn more about teaching rhyming, I learned that a daily, consistent, systematic approach is the most effective.  Although I did find some instruction in our adopted ELA program, mainly in the Phonemic Awareness Intervention Teacher's Edition, I had to look for outside resources to find a daily explicit, structured program.

My class completed 10 weeks of a combination of the first five stages of rhyming, then we were ready for successful rhyme production.  Nursery Rhymes were included starting in week 9 as part of language awareness. We are currently on week 19.  Each rhyming lesson takes 2-3 minutes. If you would like to learn more about the program I used, go to www.heggerty.org.

I was curious in the data for my class and previous classes so I looked back at my ESGI data in the district rhyming assessments.  I saw my current students achievement in rhyming as 23% higher than in previous years.  As I gain more experience in teaching rhyming explicitly, I am confident that my students' scores will only increase.

Tuesday, March 16, 2021

How-To: A Quick Guide to Using Nearpod and Great Minds In-Sync (Eureka Math) Platforms

 I'm sure at this point, a year into the pandemic, you have watched a lot of "how-to" videos and learned many many different platforms.  I just thought I'd take a minute to share with you how I use the platforms Nearpod, and Great Minds In-Sync(Eureka Math) in my virtual classroom.  So this more of how I specifially use the platforms throughout my virtual instruction, and less of a how to get started type of a thing!

Nearpod

Nearpod is a digitial platfrom that allows you to make any of your lessons interactive.  You can use any lessons you have already created (ppt, google slides, word, even YouTube vids!) and make them interactive.  You can also create lessons through Nearpod.  It really increases student engagement, especially through the use of Collaborate boards, or the Draw It board feature (like a digital whiteboard).  

I create Collaborate boards across the curriculum.  I make them for Socio-Emotional Learning (morning circle discussions).  I make them for most componenets of a Eureka Math lesson: Application Problem, Student Debrief, and Exit Tickets.  I also create them for ELA to use with our Wonders curriculum for the "Making Connections" questions that are throughout the anthology stories.  I also create them with the vocab skills in mind, such as: similes, metaphors, greek roots etc.  

Additionally I often create a collaborate board for a digital version of the Kagan strategy, Jot Thoughts.  This is a strategy traditionally done in the classroom where kids work in table groups with sticky notes.  So instead, this is done with digital sticky notes on the collaborate board. Watch the video below to see a more detailed explanation of this strategy as well as examples of the above mentioned ways I use Nearpod.


Great Minds In-Sync (Eureka Math)
Great Minds is the parent company to Eureka Math.  They have created a full digital, interactive version of the Eureka Math Curriculum called "In-Sync."  This platform has been a life-saver as they have high quality engaging lesson videos.  These encompass the full concept development component of a Eureka math lesson.  Also, all student pages: Sprints, problem sets, succeed pages, etc are included as writeable PDFs, which make it really easy to use with google classroom.  Watch my video below where I talk more about how I specifically use the different features within the In-Sync site.

If you have ever considered using either of these platforms: Nearpod or In-Sync, but weren't really sure how exactly to implement in your virtual classroom, I hope this helped! Both of these platforms have been a life-saver for online learning and have really helped me boost engagment with my virtual lessons.

Virtually Learning,

Copy of pic- Megan Brown.jpg


Quick Guide: Assigning a Specific Lesson on iReady


For the past four weeks, I have been assigning one teacher 'assigned lesson' to my students through the iReady Math program.

I realized that I could use the iReady Math program to offer further support for my students of skills I teach in class that need further reinforcement.  And I could also use the iReady Math program to give students some exposure to skills I have not taught that may be easy to 'quickly' learn on their own ahead of CAASPP.

I choose my lessons carefully so that I am supporting students and not supplanting the purpose of what iReady Math was intended for by the District.  I first preview the iReady Math Lesson by taking the quiz associated with the lesson to ensure that the lesson is not covering something that will be to difficult.  I then assign it to my classes.  And then I verify that a student has not already passed the lesson - if they have, then I unassign it to them.

Here is a quick video of me doing this:


Guide to Assigning a Lesson on iReady


I hope this helps and gives you ideas of how to further use the iReady program in your individual classrooms.


Please during these difficult times, give yourself grace and if you have given yourself grace, then give yourself more.


Kevin Stott                                    

De Anza Middle School                

Math 7/ Math 8/ Integrated Math I


Friday, March 12, 2021

How to Hold Students Accountable with Jamboard


Out of all the new tools I've tried this school year, Jamboard is my favorite! I love how easy it is to create, share with students, and collaborate with this tech tool. My students also loved to use it for brainstorming within their groups and with the whole class. The more I used it (like most things), the easier it was to use. The only negative I found to Jamboard was I could not easily keep track of which students were actively engaged in the learning and which students were not. 


I tried to keep track by crossing off my students' names on the rosters or just getting a total count, but I still found it difficult to hold students accountable and to check for understanding. Those two things are what I've struggled with most during distance learning, so when this new tech tool didn't work the way I needed it to, I became frustrated. Then, the Jamboard gods answered my prayers and let the user upload a background. This was a GAME CHANGER!


With the ability to create or upload your own background, you can make interactive templates to suit your instructional needs.


Here is what I started doing for accountability and checking for understanding: 


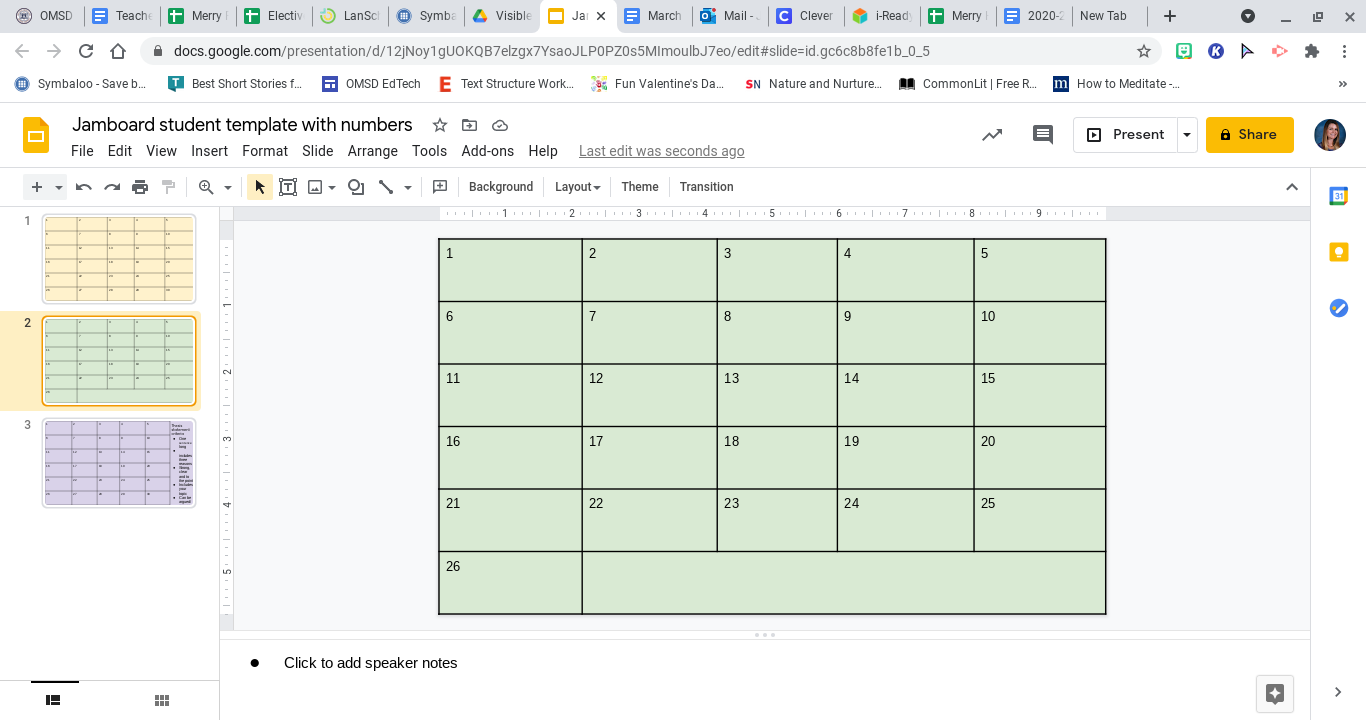
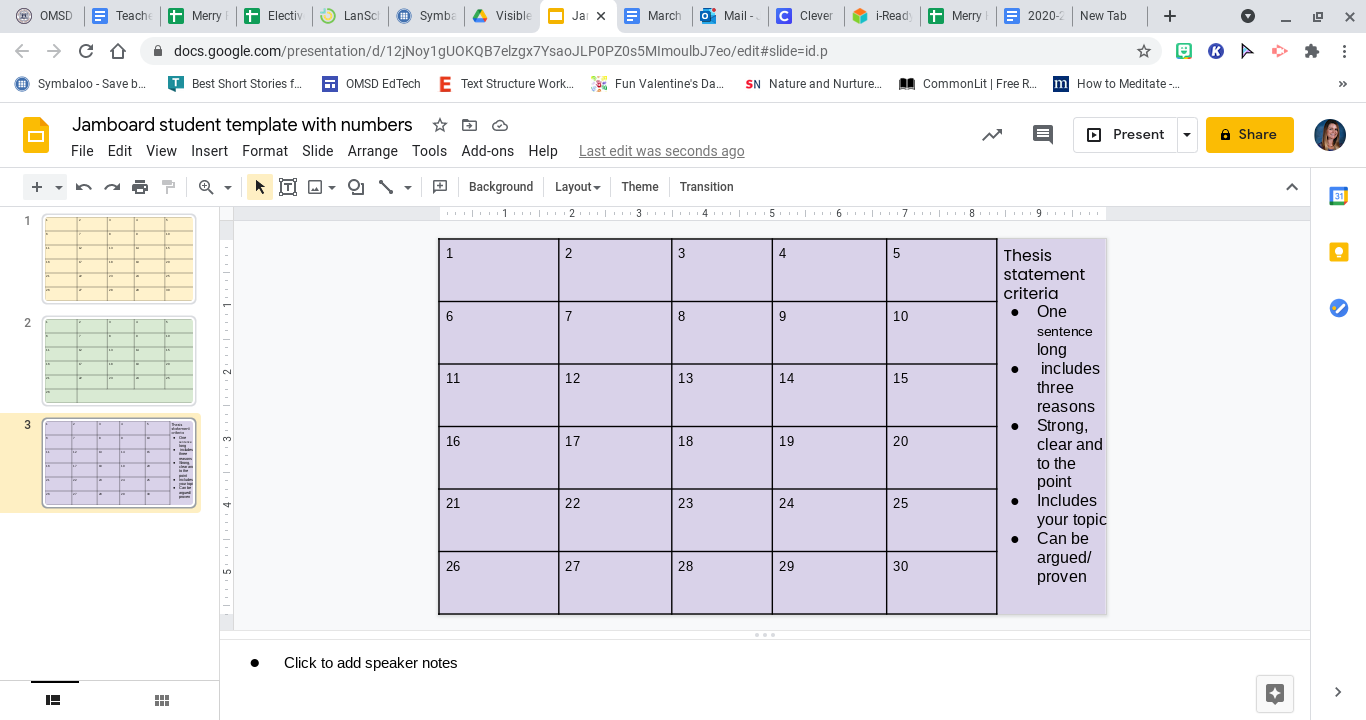
  1. In Google Slides, I created a blank slide with enough spaces for the total number of students I have in each class. I have 26 in one and 30 in the other. To make these spaces, you go to the top toolbar> insert> table> 5x6, and then format. 


  1. Then you can add the task instructions in the space on the bottom or the side of the slide. I find it easier to type out the task on slides rather than on Jamboard. 


  1. Next, you have to download the single slide onto your computer or into your Drive. To do this go to the top toolbar> file> download> JPEG image. If you are working on a laptop or desktop, the JPEG should download onto your files, and if you're using a Chromebook, then the JPEG will download into your Drive. 

  2. Finally, you go to a new Jamboard and set the background. You'll see the original backgrounds, and then in the bottom right-hand corner, there will be a box with the image to the right. Click on that and upload your JPEG from your computer or
    Drive. 

Once your interactive template is created, you can share the click with your students through Google Classroom or the chat. Below is an example of one I did with my 6th graders for the first draft of their thesis statements. 


Students posted their thesis statements after researching a topic of their choice. As you can see, I can easily see who didn't participate right away and ask them to hang back during break or keep them in the main room while the rest of the students work in small group breakout rooms. I also can make each sticky note bigger to read their responses and check for understanding. This lesson took 10 minutes to plan and create and about 30 minutes to run through in the virtual setting. 


Please let me know of any ideas you've tried out on Jamboard!

Jenni Merry


Thursday, March 11, 2021

Ease Returning-to-School Anxiety

    As a teacher, it has always been an adjustment to return to school after the summer break. We create plans on how to start the year, revisit what worked and what didn't work, and set up our classrooms in-between staff meetings. This time we are returning to school during a global pandemic with approximately 45 days left until the last day of school. We have been working with students online, but they have never stepped foot into our classroom. We will come up with plans to help them adjust to school life and deal with separation anxiety. Our students have been at home with their families for 365 days straight. Some students may have a hard time leaving home and staying with us, even though they know us. As teachers, we must set the stage for these students. We must set a positive tone and make going to school fun and exciting. 

    Students are going to go to school with many emotions. It is important to address their needs immediately. It is how we present ourselves that will also ease those anxious feelings. Students will not be able to see our mouths, but they will be able to see our eyes and hear the tone in our voices. It is our responsibility to help them get adjusted. We can do this by expressing our happiness and excitement to have them at school. It is a great idea to start the day with checking in on the students' social-emotional needs. Students will need to talk and share how they are feeling.  They can do this verbally, written, or in drawings. We need to validate students feelings and provide a safe space to do that. We must also continue to use our resources such as, "OMSD Social-Emotional Learning (SEL) Teacher Toolkit and Delivery Plan," to support our students' needs. I plan to revisit some of the activities that I did back in August and September 2020. 
    

The first few days should be fun, and playing games are great way to do just that! We Are Teachers has a great article on fun indoor recess games to play for older students. I have pinned many ideas from Pinterest. I searched, "Social distancing classroom games for kindergarten." They are many more resources available online. What we need to understand is that our students have been home this whole time just like us, but maybe without the needed space to go play outside. Students need to play. I will play lots of games with my kindergarten students.  I will use fun games from Whole Child Counseling. They have some fun games on the teaching of exactly what 6ft of social distancing looks like for kids. Students this young do not understand how to measure 6 feet from another person. It's important to show the students what it means and why it's important.  

    Academics are crucial and students still need to learn. State testing has not been postponed and that has added pressure to all the teachers teaching 3rd grade and above. But, I ask that everyone please remember, our students are children and have also been affected by this pandemic. We need to be there for them, more now than ever. Their feelings and emotions will affect how they learn once they return to in-person learning. Let's show each of them that we care and that we have missed them terribly. Let's show grace and kindness towards them and each other. Let's bring joy and happiness to being back in school again. Remember, there are some students that miss us and need us. Let's be their happy and safe place once again.

Excited and Anxious,
Maricella Mesa

Wednesday, March 10, 2021

Forever in the Middle: Late Work and Folder Rules in Outlook


We can all agree that the amount of emails we receive and need to respond to on a daily basis has increased dramatically in the last year.  Many of the emails I was receiving regarded late work turned in on Google Classroom. This is a feature that can be turned off but I like having the notification so that I know the work was done and remember to go back to it when I get a chance. However, it got to a point where more urgent emails were getting lost in the midst of these notifications. In October, I set up a "late work" folder in Outlook, which automatically filed emails regarding late work turn in on Google Classroom from my inbox. This helped tremendously with my email overwhelm, but there were still weekends where I would find over 60 late work assignments turned in through Google Classroom in my late work folder. 

In January, I had come to my breaking point with late work being turned in despite limits being placed on due dates. Unfortunately in Google Classroom, there is no way to "lock" an assignment so even when the assignment is overdue, students can still access it. It is definitely frustrating to keep having these turned in past the grace period. I figured there had to be a better way to filter these out.

That's when I discovered a "hack" some teachers were using: they place an emoji lock icon at the beginning of assignment titles in Google Classroom once the late work "grace period" has ended. It doesn't actually lock the assignment, but it makes sorting through late assignment submissions so much easier. I went through and added that lock icon to all assignments past the due date grace period. Now when I go into my late work folder, I can see which assignments were turned in within the appropriate time and which assignments were turned in too late. This helps me prioritize what I grade and filter out what I will not.

Copy the lock emoji here --->   🔒 

Video: How to create a rule for Outlook folders


Keep the magic alive,


Kandyce Valverde
7/8 Language Arts
Wiltsey Middle School


Most Viewed Posts