Tuesday, March 16, 2021

How-To: A Quick Guide to Using Nearpod and Great Minds In-Sync (Eureka Math) Platforms

 I'm sure at this point, a year into the pandemic, you have watched a lot of "how-to" videos and learned many many different platforms.  I just thought I'd take a minute to share with you how I use the platforms Nearpod, and Great Minds In-Sync(Eureka Math) in my virtual classroom.  So this more of how I specifially use the platforms throughout my virtual instruction, and less of a how to get started type of a thing!

Nearpod

Nearpod is a digitial platfrom that allows you to make any of your lessons interactive.  You can use any lessons you have already created (ppt, google slides, word, even YouTube vids!) and make them interactive.  You can also create lessons through Nearpod.  It really increases student engagement, especially through the use of Collaborate boards, or the Draw It board feature (like a digital whiteboard).  

I create Collaborate boards across the curriculum.  I make them for Socio-Emotional Learning (morning circle discussions).  I make them for most componenets of a Eureka Math lesson: Application Problem, Student Debrief, and Exit Tickets.  I also create them for ELA to use with our Wonders curriculum for the "Making Connections" questions that are throughout the anthology stories.  I also create them with the vocab skills in mind, such as: similes, metaphors, greek roots etc.  

Additionally I often create a collaborate board for a digital version of the Kagan strategy, Jot Thoughts.  This is a strategy traditionally done in the classroom where kids work in table groups with sticky notes.  So instead, this is done with digital sticky notes on the collaborate board. Watch the video below to see a more detailed explanation of this strategy as well as examples of the above mentioned ways I use Nearpod.


Great Minds In-Sync (Eureka Math)
Great Minds is the parent company to Eureka Math.  They have created a full digital, interactive version of the Eureka Math Curriculum called "In-Sync."  This platform has been a life-saver as they have high quality engaging lesson videos.  These encompass the full concept development component of a Eureka math lesson.  Also, all student pages: Sprints, problem sets, succeed pages, etc are included as writeable PDFs, which make it really easy to use with google classroom.  Watch my video below where I talk more about how I specifically use the different features within the In-Sync site.

If you have ever considered using either of these platforms: Nearpod or In-Sync, but weren't really sure how exactly to implement in your virtual classroom, I hope this helped! Both of these platforms have been a life-saver for online learning and have really helped me boost engagment with my virtual lessons.

Virtually Learning,

Copy of pic- Megan Brown.jpg


Quick Guide: Assigning a Specific Lesson on iReady


For the past four weeks, I have been assigning one teacher 'assigned lesson' to my students through the iReady Math program.

I realized that I could use the iReady Math program to offer further support for my students of skills I teach in class that need further reinforcement.  And I could also use the iReady Math program to give students some exposure to skills I have not taught that may be easy to 'quickly' learn on their own ahead of CAASPP.

I choose my lessons carefully so that I am supporting students and not supplanting the purpose of what iReady Math was intended for by the District.  I first preview the iReady Math Lesson by taking the quiz associated with the lesson to ensure that the lesson is not covering something that will be to difficult.  I then assign it to my classes.  And then I verify that a student has not already passed the lesson - if they have, then I unassign it to them.

Here is a quick video of me doing this:


Guide to Assigning a Lesson on iReady


I hope this helps and gives you ideas of how to further use the iReady program in your individual classrooms.


Please during these difficult times, give yourself grace and if you have given yourself grace, then give yourself more.


Kevin Stott                                    

De Anza Middle School                

Math 7/ Math 8/ Integrated Math I


Friday, March 12, 2021

How to Hold Students Accountable with Jamboard


Out of all the new tools I've tried this school year, Jamboard is my favorite! I love how easy it is to create, share with students, and collaborate with this tech tool. My students also loved to use it for brainstorming within their groups and with the whole class. The more I used it (like most things), the easier it was to use. The only negative I found to Jamboard was I could not easily keep track of which students were actively engaged in the learning and which students were not. 


I tried to keep track by crossing off my students' names on the rosters or just getting a total count, but I still found it difficult to hold students accountable and to check for understanding. Those two things are what I've struggled with most during distance learning, so when this new tech tool didn't work the way I needed it to, I became frustrated. Then, the Jamboard gods answered my prayers and let the user upload a background. This was a GAME CHANGER!


With the ability to create or upload your own background, you can make interactive templates to suit your instructional needs.


Here is what I started doing for accountability and checking for understanding: 


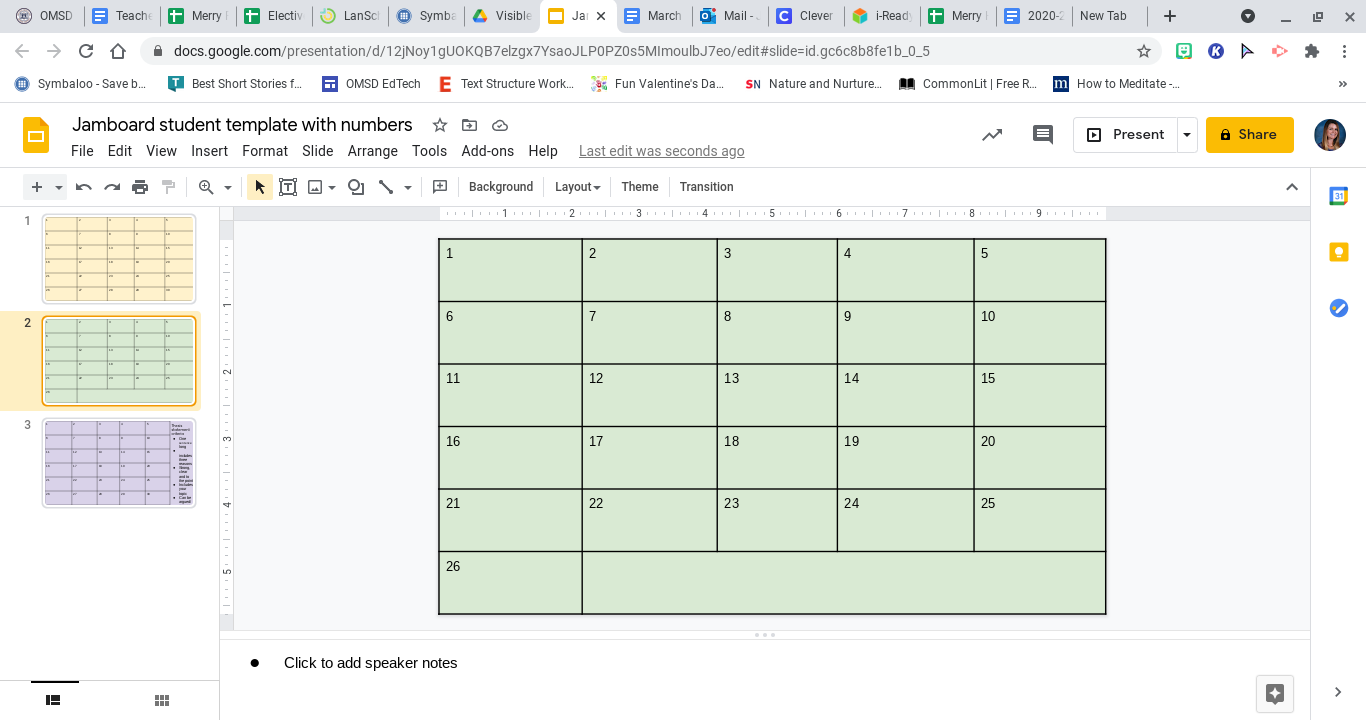
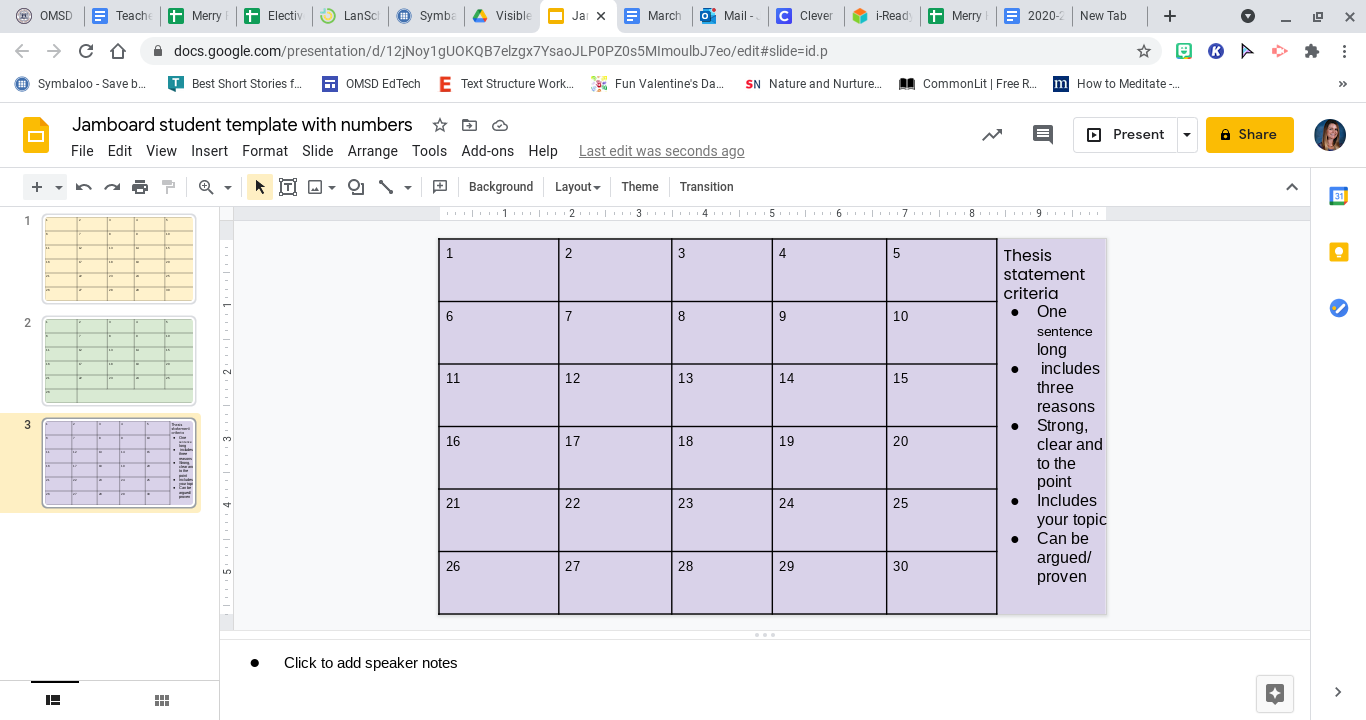
  1. In Google Slides, I created a blank slide with enough spaces for the total number of students I have in each class. I have 26 in one and 30 in the other. To make these spaces, you go to the top toolbar> insert> table> 5x6, and then format. 


  1. Then you can add the task instructions in the space on the bottom or the side of the slide. I find it easier to type out the task on slides rather than on Jamboard. 


  1. Next, you have to download the single slide onto your computer or into your Drive. To do this go to the top toolbar> file> download> JPEG image. If you are working on a laptop or desktop, the JPEG should download onto your files, and if you're using a Chromebook, then the JPEG will download into your Drive. 

  2. Finally, you go to a new Jamboard and set the background. You'll see the original backgrounds, and then in the bottom right-hand corner, there will be a box with the image to the right. Click on that and upload your JPEG from your computer or
    Drive. 

Once your interactive template is created, you can share the click with your students through Google Classroom or the chat. Below is an example of one I did with my 6th graders for the first draft of their thesis statements. 


Students posted their thesis statements after researching a topic of their choice. As you can see, I can easily see who didn't participate right away and ask them to hang back during break or keep them in the main room while the rest of the students work in small group breakout rooms. I also can make each sticky note bigger to read their responses and check for understanding. This lesson took 10 minutes to plan and create and about 30 minutes to run through in the virtual setting. 


Please let me know of any ideas you've tried out on Jamboard!

Jenni Merry


Thursday, March 11, 2021

Ease Returning-to-School Anxiety

    As a teacher, it has always been an adjustment to return to school after the summer break. We create plans on how to start the year, revisit what worked and what didn't work, and set up our classrooms in-between staff meetings. This time we are returning to school during a global pandemic with approximately 45 days left until the last day of school. We have been working with students online, but they have never stepped foot into our classroom. We will come up with plans to help them adjust to school life and deal with separation anxiety. Our students have been at home with their families for 365 days straight. Some students may have a hard time leaving home and staying with us, even though they know us. As teachers, we must set the stage for these students. We must set a positive tone and make going to school fun and exciting. 

    Students are going to go to school with many emotions. It is important to address their needs immediately. It is how we present ourselves that will also ease those anxious feelings. Students will not be able to see our mouths, but they will be able to see our eyes and hear the tone in our voices. It is our responsibility to help them get adjusted. We can do this by expressing our happiness and excitement to have them at school. It is a great idea to start the day with checking in on the students' social-emotional needs. Students will need to talk and share how they are feeling.  They can do this verbally, written, or in drawings. We need to validate students feelings and provide a safe space to do that. We must also continue to use our resources such as, "OMSD Social-Emotional Learning (SEL) Teacher Toolkit and Delivery Plan," to support our students' needs. I plan to revisit some of the activities that I did back in August and September 2020. 
    

The first few days should be fun, and playing games are great way to do just that! We Are Teachers has a great article on fun indoor recess games to play for older students. I have pinned many ideas from Pinterest. I searched, "Social distancing classroom games for kindergarten." They are many more resources available online. What we need to understand is that our students have been home this whole time just like us, but maybe without the needed space to go play outside. Students need to play. I will play lots of games with my kindergarten students.  I will use fun games from Whole Child Counseling. They have some fun games on the teaching of exactly what 6ft of social distancing looks like for kids. Students this young do not understand how to measure 6 feet from another person. It's important to show the students what it means and why it's important.  

    Academics are crucial and students still need to learn. State testing has not been postponed and that has added pressure to all the teachers teaching 3rd grade and above. But, I ask that everyone please remember, our students are children and have also been affected by this pandemic. We need to be there for them, more now than ever. Their feelings and emotions will affect how they learn once they return to in-person learning. Let's show each of them that we care and that we have missed them terribly. Let's show grace and kindness towards them and each other. Let's bring joy and happiness to being back in school again. Remember, there are some students that miss us and need us. Let's be their happy and safe place once again.

Excited and Anxious,
Maricella Mesa

Wednesday, March 10, 2021

Forever in the Middle: Late Work and Folder Rules in Outlook


We can all agree that the amount of emails we receive and need to respond to on a daily basis has increased dramatically in the last year.  Many of the emails I was receiving regarded late work turned in on Google Classroom. This is a feature that can be turned off but I like having the notification so that I know the work was done and remember to go back to it when I get a chance. However, it got to a point where more urgent emails were getting lost in the midst of these notifications. In October, I set up a "late work" folder in Outlook, which automatically filed emails regarding late work turn in on Google Classroom from my inbox. This helped tremendously with my email overwhelm, but there were still weekends where I would find over 60 late work assignments turned in through Google Classroom in my late work folder. 

In January, I had come to my breaking point with late work being turned in despite limits being placed on due dates. Unfortunately in Google Classroom, there is no way to "lock" an assignment so even when the assignment is overdue, students can still access it. It is definitely frustrating to keep having these turned in past the grace period. I figured there had to be a better way to filter these out.

That's when I discovered a "hack" some teachers were using: they place an emoji lock icon at the beginning of assignment titles in Google Classroom once the late work "grace period" has ended. It doesn't actually lock the assignment, but it makes sorting through late assignment submissions so much easier. I went through and added that lock icon to all assignments past the due date grace period. Now when I go into my late work folder, I can see which assignments were turned in within the appropriate time and which assignments were turned in too late. This helps me prioritize what I grade and filter out what I will not.

Copy the lock emoji here --->   ðŸ”’ 

Video: How to create a rule for Outlook folders


Keep the magic alive,


Kandyce Valverde
7/8 Language Arts
Wiltsey Middle School


Quick Checks for Understanding-Formative Assessment

Using formative assessment is a proven technique for improving student learning that works both in the classroom and virtually. Formative assessments are designed to check for understanding and provide students with feedback and support. They are one of the most effective ways to improve student learning. I understand that virtually, there is still a need to cover large amounts of information and develop many skills in less time than we are used to, but by not taking the time to check for understanding to ensure that students understand a concept or can effectively apply it, will hurt student achievement. 


 Thankfully, teachers can use practical formative assessment techniques as a quick "pulse check" to gauge students' understanding.


As teachers, we do not need to reinvent our traditional formative assessments completely; however, we need to modify them to work in our current situation. Formative assessments might feel harder now in a virtual setting- you can't monitor the room and look over a student's shoulder-but they do not have to be more challenging. Here are some techniques that can be applied across grades and subject areas in virtual, hybrid, and in-person learning environments.  


1. Show Me

Ask students to display a designated hand sign to indicate their degree of confidence in their understanding of a concept, principle, or process. Examples include:


  • Thumbs Up- I understand_______and can explain it in my own words.
  • Wave hand- I'm not entirely sure about____and I'm not sure I could explain it.
  • Thumbs down- I don't understand yet and cannot explain it.  
  • 1-3 Rating- Students can show you 1- Do not understand, 2- Kind of Understand, or 3- Fully understand.
  • Color system- Green-go ahead, I get it, Yellow-Still processing, or Red-Stop! I don't understand.


Self-assessment and self-reporting can be inaccurate, so use random calling to select students with their thumbs up and ask them to explain. Virtually students may also use designated emojis to signal their understanding. 


2. Choose One

Present students with a few choice statements or questions containing understanding or a common misconception and have them select a response (true or false, agree or disagree) via a poll, chatbox, whiteboards, or hand signal. This efficient technique is handy to check students' prior knowledge or potential misconceptions before beginning new instruction. Examples include:


  • True/False- E.g.-When dropped from the same height, a bowling ball will land before a marble.
  • Agree/Disagree- E.g., Is this an example of a noun?
  • Digital Journal-Google classroom or Seesaw- Students can respond individually to prompts like K-W-L or a 3-2-1 (3 things you found out, 2 things you found interesting, and 1 thing you didn't understand) chart.


3. Create It

A visual depiction, such as graphic organizers and concept maps, can be used. Students can create a visual representation of information and then explain their graphics. Virtually students can post their maps via Seesaw, Google slide, Nearpod, or Jamboard. Examples include:


  • Thinking Maps-Examples
    • Flow map- to show events in a story
    • Circle map- to show words with ____ sound
    • Tree Map- to organize phonic patterns with many spelling
    • Bubble Map- to show what plants need to grow
    • Double Bubble- to compare and contrast two stories
  • Collages, sketches, art, music, and/or drama to share their thinking
    • Write a poem or song.
    • Act out a chapter from a book.
    • Draw or paint the life cycle of a butterfly.


4. Troubleshoot 

One of the most productive and useful quick checks involves troubleshooting. Pose students with a common misconception or a frequent procedural error. See if they can:


  1. identify a flaw or error.

  2. fix the mistake.


Their responses will provide a glimpse of the depth of their understanding.


Examples:

  • Present a rough draft of writing/sentences and ask students to help correct grammatical errors.
  • Have students review a multi-step math problem, find mistakes, and correct them.
  • Place students in Breakout rooms with a partner with a rubric to evaluate each other's assignments and give each other feedback.  

5. Summarize 

Having students summarize what they are learning is an effective means of increasing comprehension and retention of new material and insight into whether students grasp essential ideas. Examples include:


  • What's the big idea? Type in chat, record on Flipgrid or Seesaw.
  • Record a one-minute video summarizing a story you read.
  • Type what you learned today and submit it on Seesaw or Google classroom.


6. Practice 

Understanding is revealed when students can transpose their learning to different situations. One of the best checks for knowledge is to see if your students can apply the material in its context. This involves having students create and/or solve new examples to illustrate the learned concept. Using the knowledge can also mean solving the same type of problems independently as an Exit Ticket. Examples include:


  • Create and have students solve "real life" word problems.
  • Locate an example of a concept learned.
  • Find examples in real life.
  • Eureka Math Exit Tickets


While these quick checks can provide valuable information about the effectiveness of teaching and student learning quality, they are not ends in and of themselves. This information should be seen as the first step in a feedback cycle. Then, the next steps are to act on that feedback-reteaching something that many students may not have learned, correcting mistakes that may be displayed, and/or providing scaffolded individual instruction to students in need. When students are given feedback, they have to be given opportunities to use it, such as revising, practicing, or correcting. This way, students can be assessed on revisions with progress noted, and new learning goals can be set.  


Positively Teaching,  
Randi Muehlen

Monday, March 1, 2021

Breaking In Zoom Breakout Rooms

Last Tuesday I was as giddy as a schoolgirl. The day had finally arrived and I was ready. Coffee? Check! My old lady glasses? Check! Paper and pencil for taking notes? Check! Euclid's turn to have Zoom Breakout Room training had arrived. I had been anxiously looking forward to this training for sooo long; I would finally be able to send students in groups to Breakout Rooms. (Confession: Clearly, I haven't had a lot to look forward to during this pandemic...lol.)

Kudos to our district TOAs who arrived bright and early and ready to share their knowledge and expertise. (They are, in fact, experts at their craft and more than willing to go the extra mile to ensure we feel supported in a whole host of areas. I would encourage you to reach out. We are fortunate to have them!) With Tamara Moyers at the helm, they presented a tightly-woven training on how to implement breakout rooms. In much the same way that we carefully plan our lessons, they had put a great deal of thought into the pacing and deliberately embedded comprehension checks at key points in the presentation.

I need to give a special shout-out to TOA extraordinaire,  Roni Weink, with whom my group was paired for practice. She was so patient and full of helpful tips.  Awww, the voice of experience. Before she began her new position as a district TOA and was still in the classroom, she and her students had sampled breakout rooms. 

Like a child anxiously waiting to play with a new toy, I could hardly wait for my students to take part in these mini Zoom sessions where they would finally be able to engage with others in a small group setting using Kagan engagement strategies--like we used to in the olden days. But, I knew I need to process this new information and come up with a plan for how and when I would introduce these rooms
to my students in a streamlined and logical way. I couldn't just willy-nilly send them to fend for themselves. I needed to think this through. 

I didn't start that day even though I wanted to. Doing so would not have been in my best interest nor beneficial for my students. Instead, I put this new learning in my mental crockpot and adjusted the setting to low. (I also didn't want to wait too long before practicing what I'd been taught.)

When I was ready, I explained what breakout rooms were and their purpose. So, how did my first try at breakout rooms go? It was wonderful, novel, and...left much to be desired. We debriefed and came up with a Tree Map of "Glows" and "Grows" that we can use to catapult us to the next level!  

Sharing is caring! As we embark on this third trimester, I'm going to take advantage of this platform to thank our AWESOME district leaders for all their support and guidance.

Keep on Truckin' (That's a throwback phrase from the '70s--for those of you too young to recollect!)


Lola E. Jollie


Jumpstart Student Discourse using Breakout Rooms & Feedback

 Have you ever joined a breakout room with your students and were met with pure silence? You think to yourself They should be talking because they’ve been in the room for at least 30 seconds OR they have a lot to get done and nobody is saying anything. 
When you finally do ask their response is “We already finished”- my heart plummets! Deep down I know there is so much of the conversation left to explore. My goal is to have students come back saying we need more time because our discussion was going that great! Now don’t get me wrong this isn’t always the case, sometimes my students blow me away with their conversations, but what I realized that for students who are introverts or those struggling with the concept have a difficult time succeeding in breakout rooms -even if you pair them with a complementary student. So how do you get students to talk the whole time about academics and feel confident? You get personal! These little tricks have helped students not only require them to put into perspective the work of their peers but theirs as well!


Cover All the Bases
As with everything... implementing new methods or tools can be difficult and a bit stressful. So here are some helpful tips to make everything run smoothly. 
  • Explore-Before anything... I send students into a breakout room with their partner and let them play with all of the buttons and then have them come back and discuss with the class their findings. They will soon realize many buttons are similar to being outside of the breakout room, but allowing them to get that curiosity out of the way will limit it from taking place during future breakout rooms. 
  • Topics- Start off with a non- academic topic to get them used to routines such Which One Doesn't Belong? Would You Rather Questions ; Since the topics aren't difficult they will be more inclined to share more about themselves. 
  • Think Time-Provide students with think time before sending them off. After presenting students with a problem or question (academic or non academic)- allow them 30 seconds - 2 minutes to think about what they want to say so when they enter the breakout room there is a sense of preparedness, which will limit the silence in the rooms. This is especially great for your shy students and/or your EL learners.
  • Sentence starters- During think time I like to provide possible sentence starters of how each student should start their turn with. Providing them with 2 or 3 possible options gives them an opportunity to choose which phrase they are most comfortable with. If you do with with simple non- academic questions it makes it easier to embed academic vocabulary in the future. 
  • Determine Roles/Timers-
    As you start progressing, you can determine who goes first or the responsibility for each candidate in the breakout room. When starting off I make the roles very simple. Since students don't have the ability to see your screen or timers I will keep track and then send out broadcast messages as reminders. As students progress- having an ultimate Breakout room google slides for this one makes everything run a lot smoother so students can use the timers themselves!  


Once students have grasped the concepts of Breakout Rooms and seem to do well with simple academic tasks a great way to extend your lesson is to help students. By having students complete this form either during or prior to breakout rooms it will limit the amount of silent stares because students are excited to share their feedback and genuinely help a classmate.

1. Push & Praise -  Students love this great feedback tool because it is simple and there is a positive aspect to it. This is important because many times students fear sharing their work with others since they feel that critiquing is the only aspect of feedback. In this 2 step feedback protocol students provide a "push" - where they give some kind of constructive feedback. Depending on the topic this could be something as simple as conventions or presentation. A push is meant for students to give constructive criticism. A "praise" is meant to give students positive feedback. To ensure that students understand that regardless of their outcome the effort is what matters. This could be something simple as "I like how you started the problem." or "You completed up to step three correctly." This is an easy activity to embed especially if you are having students work on an activity that they all can actively edit so then the partner giving feedback can go to their slide and give feedback. This adds both an accountability factor and also allows that students to see their slide and feedback in one place.  I like to embed this into writing for writing prompts, race response, etc. 

2. T-A-G: This is an amazing protocol. What I love is that with this procedure it forces the student to ensure that they are listening to their partner and their responses. I love to use this during presentations because it allows them to give feedback on a difficult skill- public speaking. TAG stands for T- Tell something you liked, A-Ask a question, and G- Give a suggestion. This is a bit more advanced than just a praise and push because it requires them to think about a question that focuses on their thought process when completing that assignment. What I also love about this protocol is that it also allows the viewer to give feedback. This limits some students from correcting EVERYTHING or correcting nothing at all. This specific format that I found was written on a blog from Learning in Hand with Tony Vincent where he details each section. What I loved about this is that there is required work for both parties. For the person whose work is being reviewed- they must first think about what feedback they would like. This is important because they are telling the reviewer what they need from them and therefore the feedback becomes more meaningful. It also requires them to follow up and state what they will do with that feedback once it is given. For the reviewer it requires them to not only complete TAG but do so in a way that is meaningful with the person who's work they are reviewing. If you would like a copy of a digital feedback form click HERE

3. Rubrics- Last but not least there is the handy dandy rubrics. This is a great way for students to ensure that they understand your expectations. I like to use these for RACE responses because it allows for students to receive feedback in a timely manner. Since rubrics are more of a checkoff list than actual writing -I can place students in a breakout room and know that the time spent students will be working on improving their writing Ironically I have noticed that my students love helping each other with their writing compared to any other subject. I like to use this for genre writing. What is great is that when implemented early in the drafting process students become familiar with their mistakes and tend to make them far less as the writing continues. 


                                                                             Lively Teaching, 


Jessica Magana


Most Viewed Posts