Showing posts with label digital tools. Show all posts

Monday, February 28, 2022

Assessing Spring Assessment Readiness

By Heather Pfrunder, Doctoral Candidate, SDC Teacher, and Education Specialist

February 28, 2022


Assessment ready or standard’s ready? Are we making students ready for life by maximizing instructional minutes? Often the answer is yes. During testing season it seems like the answer is… well… testing. However, if we address metacognition skills with test preparation, our students are becoming equipped with learning to perform under pressure.  Let’s look at how.


  1. Spiral Review and the Standards.


While the first objective seems pretty obvious, it really piggy-backs onto my previous article about maximizing spring growth. In a year with so much change, transition, and re-learning educators have had to rethink lessons into spiral review formats. Assessment prep is simply one more tool to refine this practice. Taking time to review objectives and test formats informs instructional minutes, especially during intervention periods. Looking over the practice test questions and formats are not only for students, but a great tool for educators in knowing how to prep students.
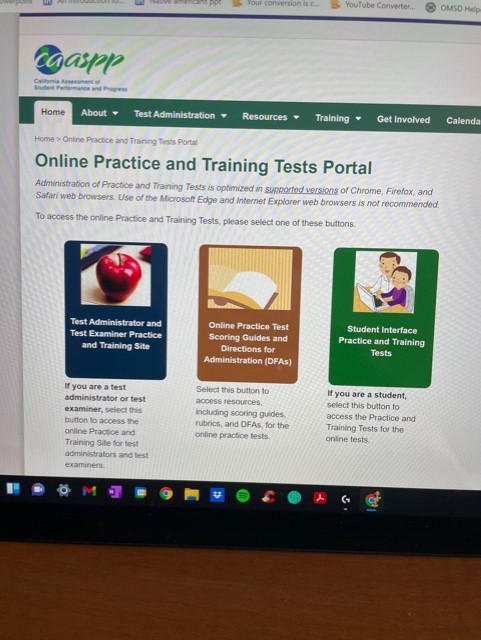

In the caaspp website teachers can review tests 

and set students up with practice test opportunities.


  1. Mindfulness and Testing


Slowing students down to breathe and focus on clarity of thought is the first step to effective test-taking skills. It also replicates needed life skills. From driver’s tests to college exams to employment tests, much of what we do in life is dependent on effective test-taking skills. Practice breathing and focusing on the question or the topic. Practice will assist students with more effective management of their emotions. Controlled breathing is a good base of ensuring heart-rate and oxygen to the brain. As a daily specific practice before practice testing, we are setting students up with a natural association of calming and test-taking strategies. Practice videos are available in our SEL toolkit, or simply click this link here.


  1. What is the question asking?


Really? Yes, really. So often in their anxiety or eagerness to quickly complete the test students forget to go slowly and really look at all the keywords of the test. Just as we expect our students to circle, box, or highlight answers, it is equally important to circle, box, or highlight key words and compare answers to the questions. While several words are bolded and underlined by caaspp, students can practice using the mousepad to highlight additional question details. An additional effective test-taking strategy is to look at the questions before reading the passages, when allowed.


Have students practice using their mouse or keypads to 

highlight key words in questions and in the text.


  1. What tools do I use?

Chances are if your students aren’t using tools, they really are not answering to the best of their abilities.  Simple things like thinking maps on paper or using an allowed 100’s or multiplication table can make the difference between making senseless errors and demonstrating true abilities. Do not assume that months of “Read, Draw, Write” or “STAR” note-taking means they will automatically use these tools in a testing environment. When you practice pre-testing observe: do your students use the tools, or do they know how to make their own? If pencil and paper are allowed for scratch paper do they know that they can draw a simple number line to add and subtract? Having students practicing these skills prior to assessment not only means that they have strategies for test-taking, but they are able to practice problem solving skills for daily assignments. Sometimes a little explicit instruction is just the boost your student needs.

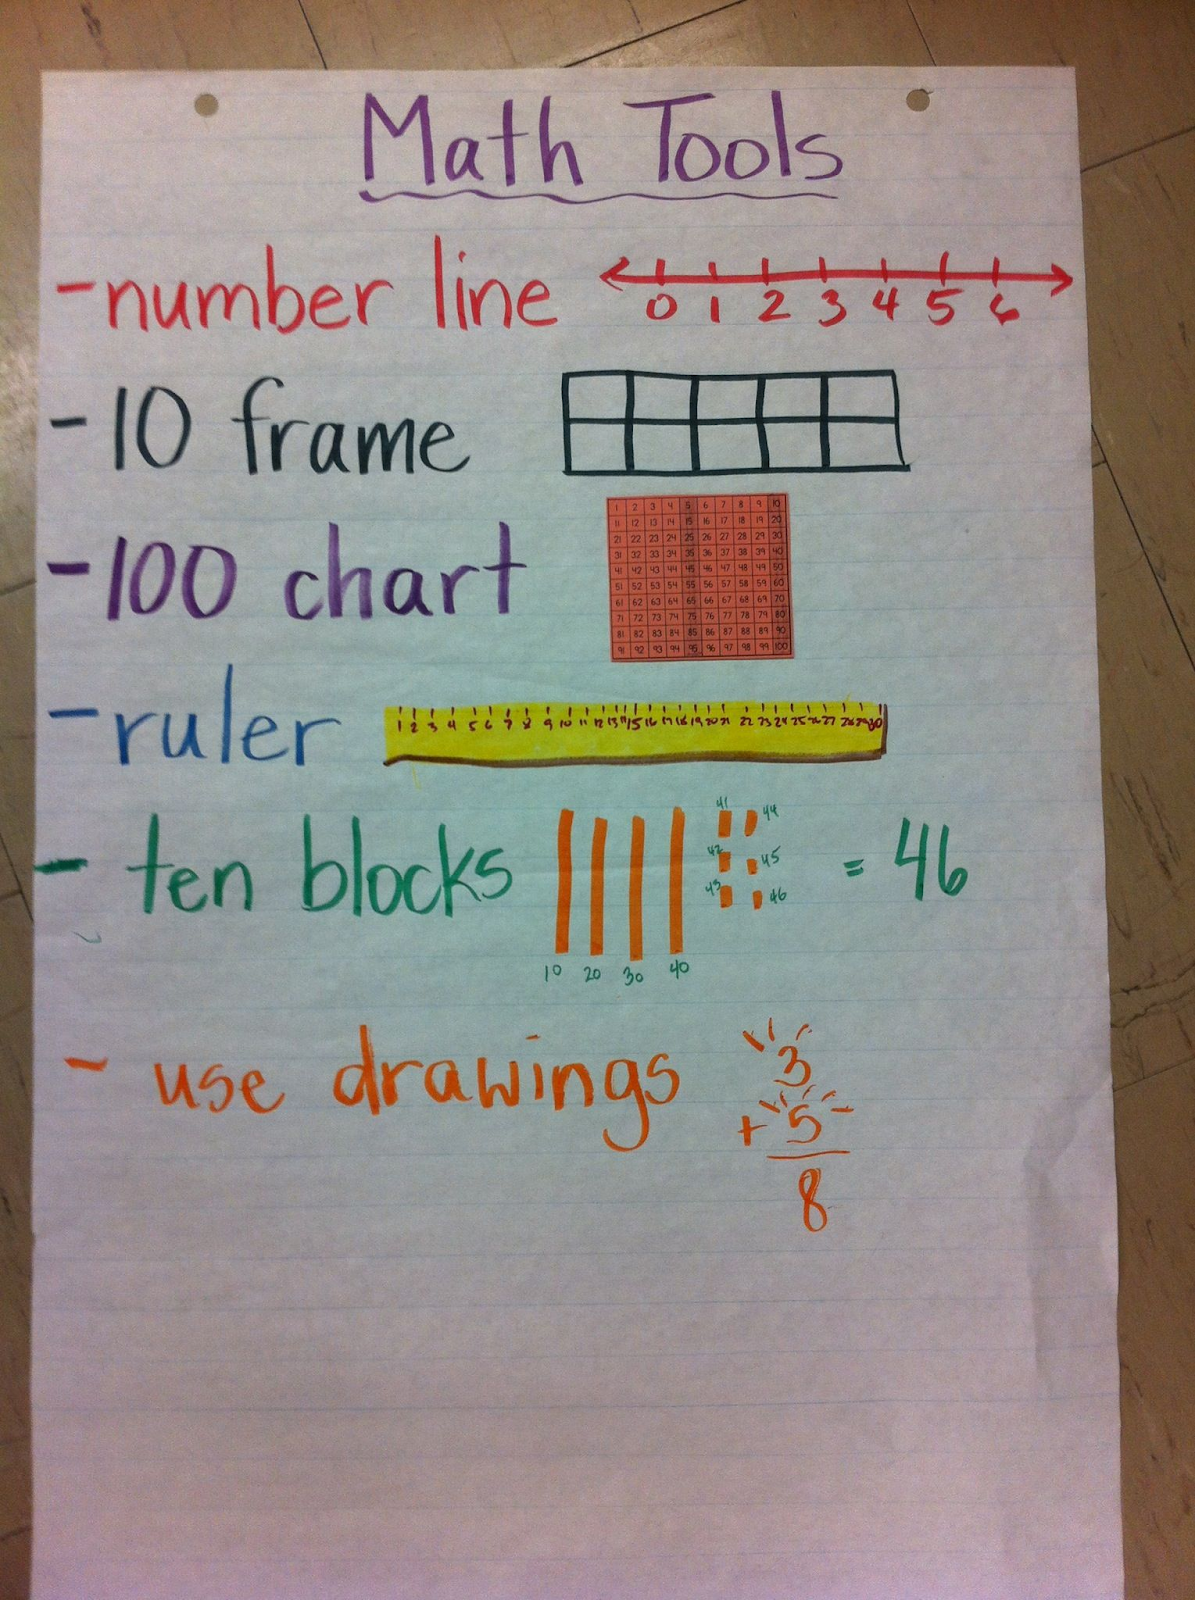

If digital tools are not available, have students practice creating their own.

Practice using pre-writing strategies they have been practicing.


Until next time, wishing you the best and may your students’ testing odds ever be in their favor…


Like what you read? Join me in upcoming blog posts where I continue to put these strategies into place and share resources!


Tuesday, September 22, 2020

Forever in the Middle: Collaboration in a Digital Classroom


Online learning has definitely increased the level of challenge in education today. Many of the strategies we use in face to face instruction have to be adapted to our new online classroom environments. Here are some ways that my students have been able to continue collaborating while learning from home.

Insert Learning
There are so many digital platforms that provide articles and comprehension questions for these articles within the text. I have always been a big fan of Newsela and Common Lit for this reason and also recently discovered and fell in love with Actively Learn. While there are a plethora of articles available through these sites, I may have something that I would like students to read that is not already available. This is where the Google extension Insert Learning comes in handy. I can take any text from Google Docs and turn it into an interactive response. This is great for really focusing on exactly the questioning or standards I want to address with that piece. Options for your responses are open ended questions, multiple choice response, and even collaboration boards. You can also insert sticky notes and highlight text to really guide student thinking as they work.


                           Discussion feature on Insert Learning.
                    Students can view peer responses in real time.

Jamboard
I started using Jamboard when I saw an idea for taking attendance using Jamboard. I tried it out and loved the ease of it and immediately saw how it could be utilized in the classroom in so many other ways.  Recently, I also used Jamboard to create a brainstorm for class thinking map in preparation for writing. I gave them time to add to the thinking map then changed them to "view only" and then grouped and arranged their ideas onto a completed map that they then used to write from. We added transition words and decided what order to include all our ideas. From there, students were able to demonstrate that they understood how to turn a Thinking Map into writing by writing a short summary of the information on the Thinking Map.  With another class, I separated the students into groups. Each group was to read a section of the article then come up with a maximum two sentence summary of that section. Their summary was then posted onto the class Jamboard. Once all responses were posted, I changed their access to "view only" and they were then able to use this to review before continuing work on the article independently. 

            Cause and Effect Map                        Compare and Contrast Map          


         Jigsaw Article Summary


Padlet
This is an old favorite of mine. Students are able to respond on a message board setup in a variety of ways. They can simply post answers to questions, converse in a message board stream, and even respond to each other's answers. The free account allows up to 10 message boards, which I have always been able to work with. You can delete older boards once they are no longer in use. I use Padlet for ongoing discussion about something we are reading as well as a review of what we have already learned. 


Google Suite
Of course, there are always collaboration options through Google Apps. I have one of my classes starting book clubs next week in small groups of four and we will be collaborating using some of the above options but will regularly communicate using a group response form in Google Sheets and a weekly check in with Google Forms. The benefit of using both is that the students within the group can communicate with each other on the Sheet but they can communicate with only me on the form. This will allow me to see how they are all contributing and to alert me of problems that I hadn't seen within the Doc. Click here for a simple template for Book Club online collaboration.


This year is definitely not what anyone expected, but I know that we are all doing what we can to make the learning meaningful from a distance. Please share some of your amazing ideas below so we can continue to inspire each other!

Keep the magic alive,


Kandyce Valverde


Wednesday, April 8, 2020

Distance Learning Brain Breaks

Let's not forget about Brain Breaks!
Brain Breaks for Online Elementary Students | The Virtual VoiceUnfortunately, due to this pandemic, we have to do some different and unconventional things like close our classrooms and teach students from our homes. Social distancing is necessary to stop the spread of the virus, but it creates some unique situations for teachers, students, and parents. As teachers, we've been taught that students need to get up and move numerous times a day to be successful learners. As a society, we've been told that a child shouldn't sit in front of a screen for long periods of time. But due to the pandemic, many students need to log in and participate in online learning daily. As all of us are experiencing, we are sitting in chairs for long periods every day. This is especially difficult for kids to do. Their little bodies weren't meant to sit still that long-they NEED to move.  There is an easy solution for students to get the movement they need while participating in online learning.  Brain Breaks!

Activity brain breaks serve an important purpose in and OUT of the classroom. As we know, school is hard work for kids. As teachers, we expect students to cram so much into each day, learning a ton of information that they need to retain and put into practice. It can be exhausting. In our classrooms, Brain Breaks allow kids to take a minute to refocus and release some energy. Distance Learning is no different. Students need active time incorporated into Distance Learning too. Kids need opportunities to have movement throughout their day while they are participating in at-home learning.  

To Boost Learning, Just Add Movement | Cult of Pedagogy


What is a Brain Break?

Brain Breaks are breaks from whatever students are currently working on... but something to remember is the break can be both fun and educational. Also, Brain Breaks can be simple or more complex. Moving around, even if it's just stretching, gives the body a boost by increasing blood flow. In turn, this provides the brain with increased blood flow, which provides kids the edge they need to help retain information and stay focused. By taking a break and moving around, kids receive a necessary tool they need to help them succeed at whatever it is they are working on. Movement is vital when it comes to brain breaks. Moving the body also helps relieve stress, which we all know many kids are experiencing right now. Movement, in turn, will give kids a release that allows them to get back to work and refocus.

How many Brain Breaks do kids need?

According to research, kids need to take a 3-5 minute break every 45 minutes of working. As each teacher adapts and creates their Distance Learning routines, they need to remind and educate parents and students on how to incorporate Brain Breaks into their day. I have been letting my families know that it is essential to have frequent breaks during learning. As a First Grade teacher, I am suggesting students work for 30-40 minutes, with a 10-15 minute break twice a day. So my students are working a total of 60-80 minutes with two 10-15 minute breaks in between. I have also suggested that my students add in 20 minutes to read to self or with someone else. These breaks will vary based on age, grade, and individual students.

What are some at-home Brain Breaks my can students do?

There are several Brain Breaks to suggest to parents and kids to help them thrive during this time. I've given parents the advice to help their child pick something they can transition to and from easily. I make it a point to say that they know what works and doesn't work best for their child. I also recommend staying away from screen time here because they are using screens for many hours a day already. I have also tried to encourage parents and siblings to join in on Brain Breaks. This situation is stressful for parents too! So if they can be goofy and/or active with their child during this time, that can also be helpful. All of these Brain Breaks can be used during our online platforms for Distance Learning. I recently had my first Zoom meeting with my kids, and after answering questions and explaining assignments, we ended our session with a group GoNoodle. They left that meeting with smiles from ear to ear. Incorporating Brain Breaks into our Distance Learning/Teaching will help students feel some normalcy and routine that they are missing from their classrooms.  


Movement Brain Breaks
1. Breaks can be as easy as jumping jacks, push-ups, and stretching to getting outside to toss a Frisbee, kick a soccer ball, a game of tag, or even a walk or bike ride.
  
2. Dance Party- When brains need breaks, nothing beats turning on a song and having a dance party. Have kids choose a song to play and let them move around and dance for the entire song.  

3. Secret Handshakes- For a quick Brain Break, have a family/sibling handshake. Take a quick minute to make up and practice a fun handshake to do anytime your child needs a break.

4. Yoga- Yoga will give kids a break they need in between tasks. Encourage kids to be mindful as they move through favorite yoga poses.  Cosmic Kids Yoga is a favorite Youtube channel with tons of themed yoga videos kids will enjoy!  

5. GoNoodle- This website gives kids a fun and silly way to work out the wiggles! Kids will love jumping, moving, and singing along to their favorite GoNoodle videos. You can stream the videos on Youtube or on your SmartTV.

6. Sami Circuit- Sami Kadar, a long-time fitness expert has recorded circuit videos on Youtube. The circuit combines a high-energy, age-appropriate music mix, sound and lighting effects, and exercises tailored to the participating age group.

Brain Break Games- Kids love playing games. Games give kids the chance to take a moment and simply have fun.  

1. Freeze Dance- This game is like freeze tag and musical chairs rolled into one single fun game. Turn on the music and have kids dance around the room. When the music turns off, kids must freeze in whatever dance moves they were doing.  

2. Would You Rather (Animal Edition)- This is just a fun game of asking the question- Would you rather be a ____ or a _____? Have students act out the animal they chose. This is a fun question to ask students during a Zoom Call or as a question of the day in your Google Classroom.  It can even turn into a writing prompt.

3. Hot Potato- Use a beanbag/ball and have families toss it around the room as the music plays. When the music stops, whoever is holding the "potato" is out.  

4. Simon Says- This game makes a great brain break for families. Kids need to pay attention as they attempt to do what Simon says.  

5. Rock Paper Scissors- This is a fun, quick way for families to engage for a brain break.  

Educational Brain Breaks- These are fun ways for your students to take a break and practice skills they might have already learned.

1. Air Spelling- Challenge kids to "air write" their spelling or High-Frequency words. Parents can have fun guessing the words.

2. Pop- Practice skip counting during a Brain Break. Pick a magic number, then have kids play with families taking turns counting, with the word POP replacing multiples of the magic number. If skip counting by 3's, the sequence would be 1-2-POP-4-5-POP...

3. Syllable Clap- Have kids talk to their parents or siblings, but while chatting, they need to clap (or stomp) the syllables of the words they say. They can also do this brain break activity with spelling words.

4. Categories- Name a category, and each person has to name a word that fits into that category. For example- Beach- then you could say words like such as sand, umbrella, etc..

No matter which of these Brain Breaks teachers, students, or parents use, I'm sure they will help our students be more successful at home throughout this quarantine. And most importantly, kids will learn and have fun!  


Positively Teaching,  
Randi Muehlen


Wednesday, September 19, 2018

Going Digital . . . Setting Goals and Starting Small

Going Digital . . . Setting Goals and
Starting Small


Last March I was lucky enough to attend the Spring CUE Conference
in Palm Springs with a few fellow educators from my school site.  I was
really looking forward to learning new and innovative ways to incorporate
technology into my classroom. Wow, what a dizzying couple of days! I
definitely came back from the conference with my mind filled with
wonderful new ideas about using digital tools with my students.  Despite
all the excitement from the conference, just a few days later, I found
myself back in the same routines that I had been in before heading to
the desert. While some of the things I learned were easy to start right
away in my classroom, there were a lot of good ideas that got put on
the back burner.  I simply categorized them as “these would be great to
use next year,” and “I have all summer to work on that.”

So here we are, well over a month into the new school year and all that
summer prepping never quite happened. Who was I kidding anyway?
Over the summer I got married, went on a fabulous 3-week honeymoon,
and moved into a new home with my husband.  Disappointed in myself, I
decided to look back on my notes from that conference and pick a few
strategies that I could easily start using in my classroom within the next
month. There were a lot of great ideas in my head, but two really stuck
out to me; #BookSnaps and Interactive Digital Notebooks.


Stay focused, go after your dreams and
keep moving toward your goals.
- LL Cool J


#BookSnaps


For me, #BookSnaps was the easiest of the two digital tools to start
using with my students.  The idea of #BookSnaps is to create a digital
and visual way for students to express what they have learned from the
text.  They can be used with any text and really help students to make
meaningful connections with what they are reading.  While the idea comes
from using the Snapchat app, the process can also be done using Pic
Collage, Seesaw, Google Drawings, and Google Slides.  Depending on
what types of devices your students have access to, and the grade you
teach you might find one platform will work better for you than others.  I
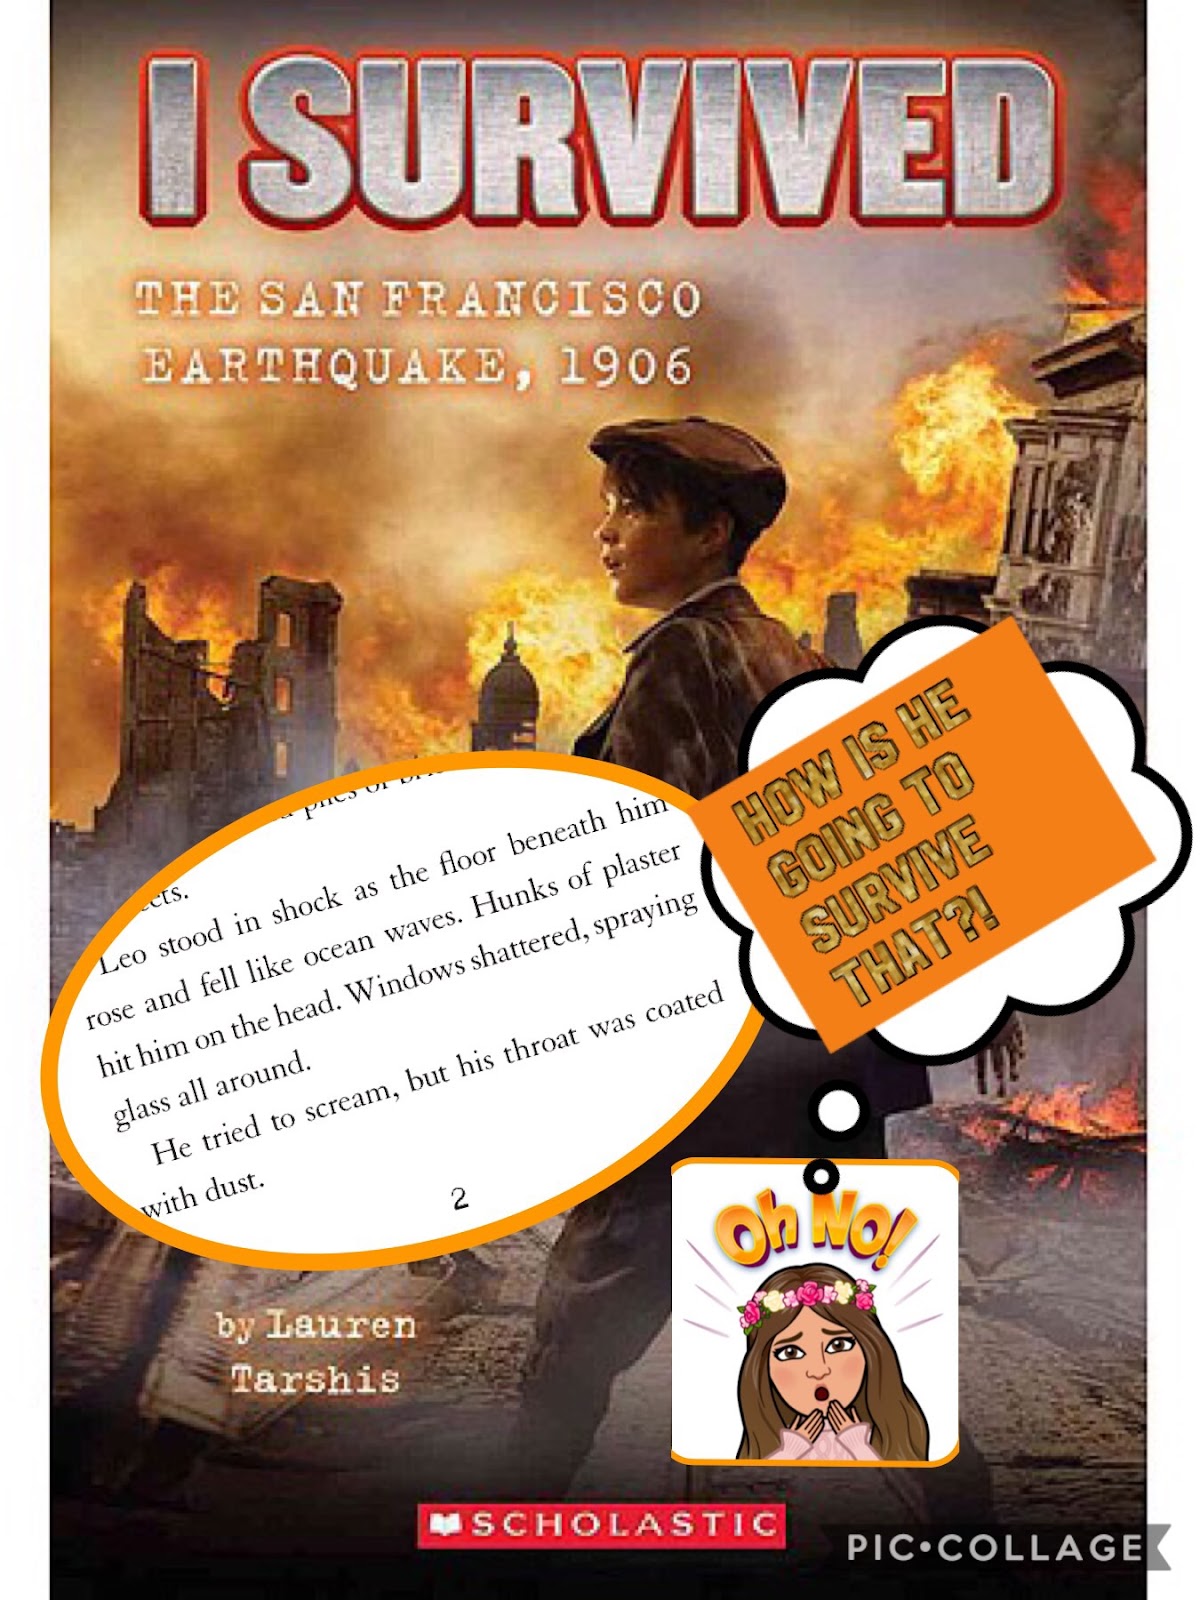
used Pic Collage to create the #BookSnap pictured above. My
students are using Google Slides on their iPads. #BookSnaps were first
started by Tara M. Martin and you can check out what she has to
say about them here.

www.tarammartin.com/resources/booksnaps-how-to-videos/  

Her website gives student examples as well as how-to videos for many
of the platforms listed above.  

Every #BookSnap should include:
  • A picture of the book cover
  • The Author's name
  • A picture of text you want to annotate
  • Annotation
They can also include:
  • emojis
  • Bitmojis
  • hashtags


Digital Interactive Notebooks


Interactive Notebooks have always been a part of my teaching.  
Students really enjoy them and they are a great way to showcase
student learning.   The downfall of Interactive Notebooks for me is the
time spent on cutting and gluing everything in them, not to mention the
inevitable mess they can create.  Why not make them digital?
Creating a Digital Interactive Notebook can require a significant
amount of prep time, but saves me time on the other end. Less
instructional time is lost. So where do you begin? Here are a few
suggestions to get started.

  • Set up your notebook in Google Slide
  • Create a cover slide and table of content.
  • Choose your format. For example the left side of your slide is
teacher input and the right side is for student output.
  • Be creative, there are so many different digital tools you can include in your Interactive Notebooks
  • Share with students using Google Classroom.
  • Be sure to make a copy for each student in Google Classroom so that students can edit.


Learning about new digital tools for the classroom is always fun for me. The hard part is actually trying some of these ideas out with my students. Start small, try one tool at a time. Don't be too hard on yourself if it does work out at first. There is always a learning curve.


Learning and Teaching with Grace,

Alina

Most Viewed Posts